
SDK
SDK
PipeLines을 구축하고 사용하기 위해서 Jupyter Notebook과 interacting이 가능한 SDK에 대해서 먼저 알아보자.
SDK란 ML Workflow를 지정하고 실행하는데 사용할 수 있는 Python Package이다.
SDK는 다음과 같은 Component를 가지고 있다.
kfp.compiler: 파이프 라인 구성 요소에 대한 Docker 컨테이너 이미지를 빌드하기 위한 클래스 및 메소드를 포함한다.
kfp.compiler.Compiler.compile: Kubeflow Pipelines service가 가능하게 Python DSL Code를 YAML형식으로 변환시킨다.kfp.compiler.build_docker_image: Dockerfile을 기반으로하는 Container image를 build하고 image를 URL로 Push한다.kfp.compiler.build_python_component: Python Function을 기반으로하는 Container image를 build하고 image를 URL로 Push한다.
kfp.components: 파이프 라인과 interacting하기 위한 Class 및 Method를 포함한다.
kfp.components.func_to_container_op: Python FUnction을 Pipeline 구성요소로 변환시키고 factory function으로 Return한다. 이러한 factory function은 Container안에 실행되는 함수이다. factory function은 pipeline task대신에 호출할 수 있다.kfp.components.load_component_from_file: Pipeline의 구성요소 중 file를 부를수 있고 factory function을 Return한다.kfp.components.load_component_from_url: Pipeline의 구성요소 중 URL를 부를수 있고 factory function을 Return한다.
kfp.dsl: 파이프 라인 및 구성 요소를 정의하고 상호 작용하는 데 사용할 수 있는 DSL이 포함되어있다.
kfp.dsl.ContainerOp: 컨테이너 이미지로 구현 된 파이프 라인 작업 (op)을 나타냅니다.kfp.dsl.PipelineParam: 한 파이프 라인 구성 요소에서 다른 파이프 라인 구성 요소로 전달할 수있는 파이프 라인 매개 변수를 나타냅니다.kfp.dsl.component: 파이프 라인 구성 요소를 반환하는 DSL 함수의 데코레이터입니다.kfp.dsl.pipeline: 파이프 라인을 반환하는 Python 함수의 데코레이터kfp.dsl.python_component: 파이프 라인 구성 요소 메타 데이터를 함수 객체에 추가하는 Python 함수의 데코레이터입니다.kfp.dsl.types: Kubeflow Pipelines SDK에 의해 정의 된 유형 목록이 포함되어 있습니다. 유형에는 String, Integer, Float 및 Bool과 같은 기본 유형과 GCPProjectID 및 GCRPath와 같은 도메인 별 유형이 포함됩니다.kfp.dsl.ResourceOp: Kubernetes 리소스를 직접 조작(create, get, apply, …)kfp.dsl.VolumeOp: PVC를 빠르게 만드는데 사용kfp.dsl.VolumeSnapshotOp: VolumeSnapshot을 빠르게 작성하는 일반적인 경우를 사용kfp.dsl.PipelineVolume: 파이프 라인 단계간에 데이터를 전달하는 데 사용되는 볼륨을 나타낸다.
kfp.Client: Kubeflow Pipelines를 위한 client libraries
kfp.Client.create_experiment: pipeline experiments를 생성하고 experiment object를 반환한다.kfp.Client.run_pipeline: Pipeline을 실행하고 object를 반환한다.
Install the Kubeflow Pipelines SDK
Python 3.5이상이 필요하다. 현재 설치 Version은 3.7 version기준이다.
현재 작업하고 있는 Python의 환경은 Python 3.6.8이다.
따라서 Kubeflow에서 제공하는 Guide에따라서 MiniConda위에서 가상환경 구축 후 SDK를 Build하기로 결정하였다.
Miniconda 설치
apt-get update; apt-get install -y wget bzip2
wget https://repo.continuum.io/miniconda/Miniconda3-latest-Linux-x86_64.sh
bash Miniconda3-latest-Linux-x86_64.sh
Miniconda Version Check
export PATH=/root/miniconda3/bin:$PATH
which conda #/root/miniconda3/bin/conda
가상환경 만들기
conda create --name mlpipeline python=3.7
conda activate mlpipeline
Install Kubeflow Pipelines SDK
pip install https://storage.googleapis.com/ml-pipeline/release/latest/kfp.tar.gz --upgrade
check Kubeflow Pipelines SDK
which dsl-compile
#/root/miniconda3/envs/mlpipeline/bin/dsl-compile
SDK를 활용하여 Samplie Compile
Compiling the samples on the command line
1. Miniconda 활성화
conda activate mlpipeline
2. Kubeflow Example Download
git clone https://github.com/kubeflow/pipelines.git
3. Example File 접근
cd pipelines
cd samples
cd cores
cd sequential
4. Compile a pipeline
export DIR=[YOUR PIPELINES REPO DIRECTORY]/samples/core/sequential
dsl-compile --py ${DIR}/sequential.py --output ${DIR}/sequential.tar.gz
5. Deploy the pipeline
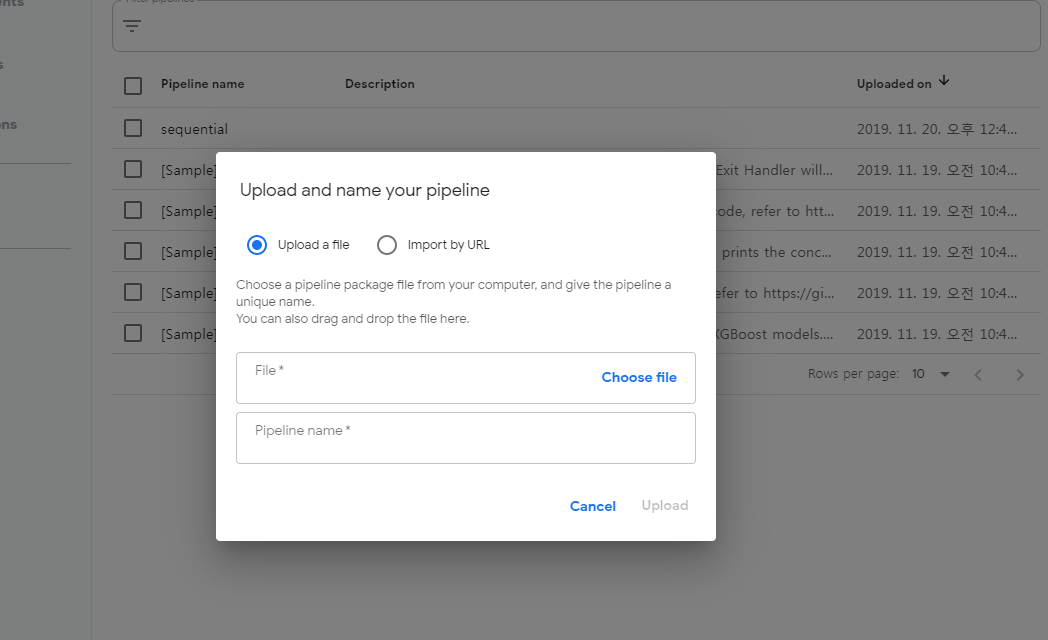
Kubeflow PipeLine 접속후 Upload pipeline 선택
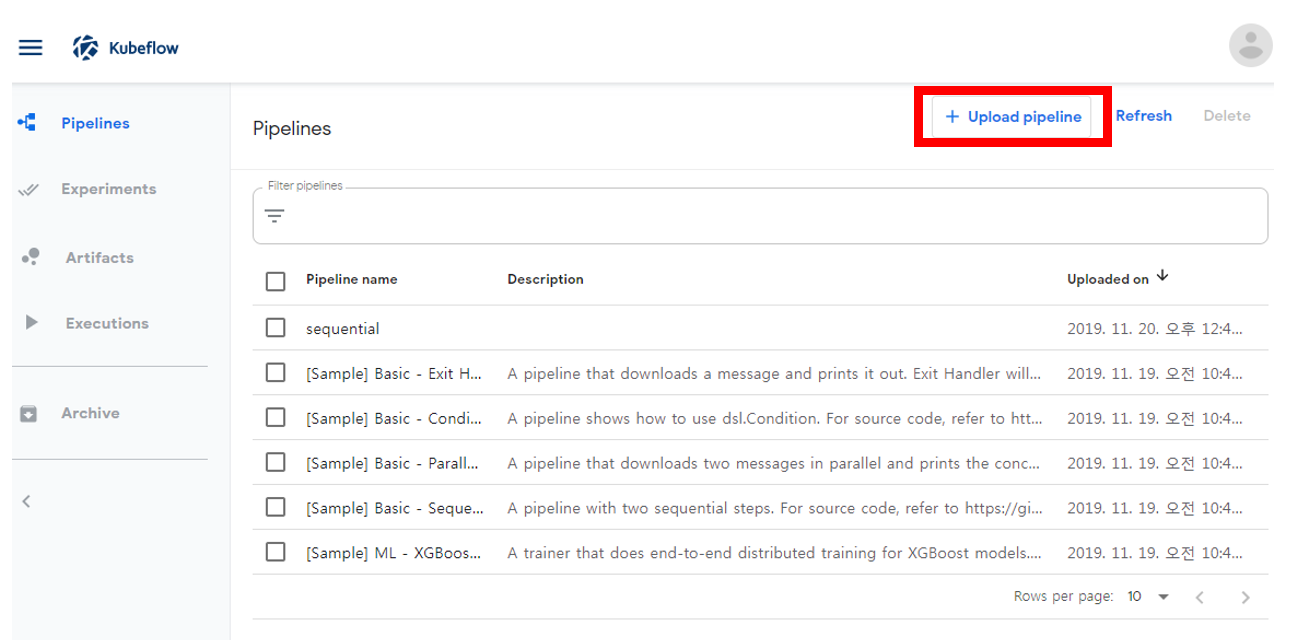
tar.gz 올리기
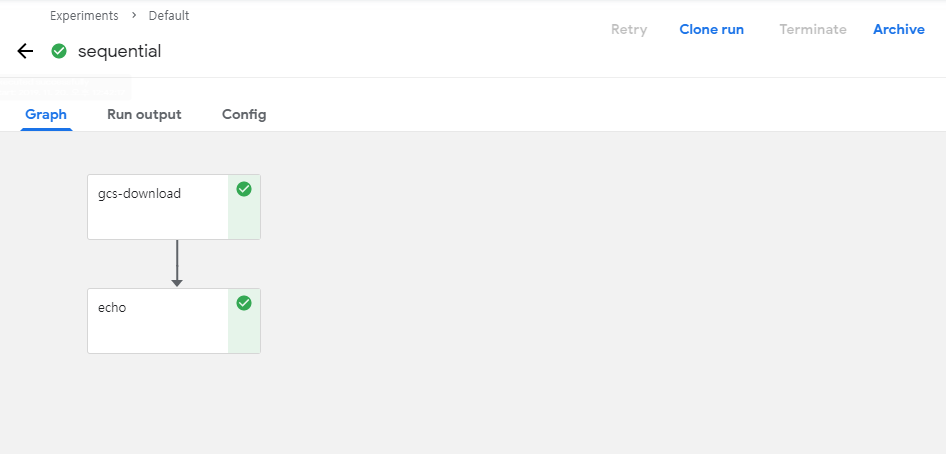
위의 예시처럼 올라간 PipeLine을 구동시키면 잘 작동하는 것을 볼 수 있다.
참고사항
현재 제공해준 sequencial.py File내용은 다음과 같다.
1
2
3
4
5
6
7
8
9
10
11
12
13
14
15
16
17
18
19
20
21
22
23
24
25
26
27
28
29
30
31
32
33
34
35
36
import kfp
from kfp import dsl


def gcs_download_op(url):
    return dsl.ContainerOp(
        name='GCS - Download',
        image='google/cloud-sdk:216.0.0',
        command=['sh', '-c'],
        arguments=['gsutil cat $0 | tee $1', url, '/tmp/results.txt'],
        file_outputs={
            'data': '/tmp/results.txt',
        }
    )


def echo_op(text):
    return dsl.ContainerOp(
        name='echo',
        image='library/bash:4.4.23',
        command=['sh', '-c'],
        arguments=['echo "$0"', text]
    )

@dsl.pipeline(
    name='Sequential pipeline',
    description='A pipeline with two sequential steps.'
)
def sequential_pipeline(url='gs://ml-pipeline-playground/shakespeare1.txt'):
    """A pipeline with two sequential steps."""

    download_task = gcs_download_op(url)
    echo_task = echo_op(download_task.output)

if __name__ == '__main__':
    kfp.compiler.Compiler().compile(sequential_pipeline, __file__ + '.zip')
위의 Method와 결과확인창을 살펴보게 되면
- def sequential_pipeline(): 최종적인 결과를 묶어서 하나의 pipeline으로 구성
- gcs_download_op(): Pipeline의 구성요소
- echo_task(): Pipeline의 구성요소 gcs_download_op()의 결과를 인자로 받음
Building a pipeline in a Jupyter notebook
Pipeline예제 중 Lightweight python components예제이다.
이러한 환경의 장점은 계속해서 Python Code를 Image로 만들고 Container를 생성하지 않고 Jupyter Notebook환경에서 간단하게 PipeLine을 구성하기 위한 용도이다.
단 몇가지 지켜야 하는 사항이 있다.
- Function should be stand-alne.
- Base Image에서 사용할 수 있는 Package만 가능하다. 만약 다른 Package를 사용해야 한다면 subprocess를 통하여 설치하여야 한다.
- Parameter의 type을 선언해야 한다. int, float, bool 3가지고 있고 나머지는 String으로 취급한다.
- Multiple Output이 Return되는 경우 NamedTuple()로서 선언하여야 한다.
Ex)NamedTuple('MyFunctionOutputs', [('output_name_1', type), ('output_name_2', float)])
Import package
1
2
import kfp
import kfp.components as comp
Simple function that just add two numbers:
아래 Code에서 중요한것은 위의 제약사항을 지키기 위하여 각각의 Parameter를 float이라고 지정하였고 Return Type도 float으로 지정하였다.
1
2
3
4
#Define a Python function
def add(a: float, b: float) -> float:
   '''Calculates sum of two arguments'''
   return a + b
Convert the funtion to a pipeline operation
선언한 Method(Function)를 Pipe라인의 구성요소로서 변환시킨다.
1
add_op = comp.func_to_container_op(add)
A vit more advanced function
좀 더 복잡한 함수를 선언한다.
중요한 것은 제약사항이 모두 들어가있는 Function을 예제로서 선언하였다는 것 이다.
- Parameter의 Type을 float으로 명시하였다.
- Output이 Multiple Output이므로 NamedTuple로서 묶고 (Name,Type)으로서 하나하나 지정하였다.
- 필요한 Package는 subprocess를 통하여 다운받았다.
1
2
3
4
5
6
7
8
9
10
11
12
13
14
15
16
17
18
19
20
21
22
23
24
25
26
27
28
29
30
31
32
33
34
35
36
37
38
39
40
41
42
43
44
#Advanced function
#Demonstrates imports, helper functions and multiple outputs
from typing import NamedTuple
def my_divmod(dividend: float, divisor:float) -> NamedTuple('MyDivmodOutput', [('quotient', float), ('remainder', float), ('mlpipeline_ui_metadata', 'UI_metadata'), ('mlpipeline_metrics', 'Metrics')]):
    '''Divides two numbers and calculate  the quotient and remainder'''
    #Pip installs inside a component function.
    #NOTE: installs should be placed right at the beginning to avoid upgrading a package
    # after it has already been imported and cached by python
    import sys, subprocess;
    subprocess.run([sys.executable, '-m', 'pip', 'install', 'tensorflow==1.8.0'])

    #Imports inside a component function:
    import numpy as np

    #This function demonstrates how to use nested functions inside a component function:
    def divmod_helper(dividend, divisor):
        return np.divmod(dividend, divisor)

    (quotient, remainder) = divmod_helper(dividend, divisor)

    from tensorflow.python.lib.io import file_io
    import json

    # Exports a sample tensorboard:
    metadata = {
      'outputs' : [{
        'type': 'tensorboard',
        'source': 'gs://ml-pipeline-dataset/tensorboard-train',
      }]
    }

    # Exports two sample metrics:
    metrics = {
      'metrics': [{
          'name': 'quotient',
          'numberValue':  float(quotient),
        },{
          'name': 'remainder',
          'numberValue':  float(remainder),
        }]}

    from collections import namedtuple
    divmod_output = namedtuple('MyDivmodOutput', ['quotient', 'remainder', 'mlpipeline_ui_metadata', 'mlpipeline_metrics'])
    return divmod_output(quotient, remainder, json.dumps(metadata), json.dumps(metrics))
Convert the funtion to a pipeline operation
선언한 Method(Function)를 Pipe라인의 구성요소로서 변환시킨다.
중요한 것은 각각의 Pipeline의 구성요소는 base_image를 지정할 수 있다는 것 이다.
1
divmod_op = comp.func_to_container_op(my_divmod, base_image='tensorflow/tensorflow:1.11.0-py3')
Define the Pipeline
Pipeline은 @dsl.pipeline decorator를 통하여 선언된다.
1
2
3
4
5
6
7
8
9
10
11
12
13
14
15
16
17
18
19
import kfp.dsl as dsl
@dsl.pipeline(
   name='Calculation pipeline',
   description='A toy pipeline that performs arithmetic calculations.'
)
def calc_pipeline(
   a='a',
   b='7',
   c='17',
):
    #Passing pipeline parameter and a constant value as operation arguments
    add_task = add_op(a, 4) #Returns a dsl.ContainerOp class instance.

    #Passing a task output reference as operation arguments
    #For an operation with a single return value, the output reference can be accessed using `task.output` or `task.outputs['output_name']` syntax
    divmod_task = divmod_op(add_task.output, b)

    #For an operation with a multiple return values, the output references can be accessed using `task.outputs['output_name']` syntax
    result_task = add_op(divmod_task.outputs['quotient'], c)
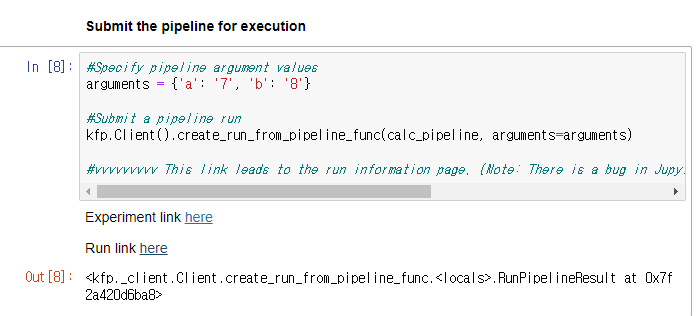
Submin the pipeline for excution
PipeLine의 Argument를 선언하고 실행한다.
1
2
3
4
5
6
7
#Specify pipeline argument values
arguments = {'a': '7', 'b': '8'}

#Submit a pipeline run
kfp.Client().create_run_from_pipeline_func(calc_pipeline, arguments=arguments)

#vvvvvvvvv This link leads to the run information page. (Note: There is a bug in JupyterLab that modifies the URL and makes the link stop working)
결과 확인
실행하게 되면 다음과 같이 Link를 출력하면서 실시간으로 PipeLine의 동작상태를 확인할 수 있다.
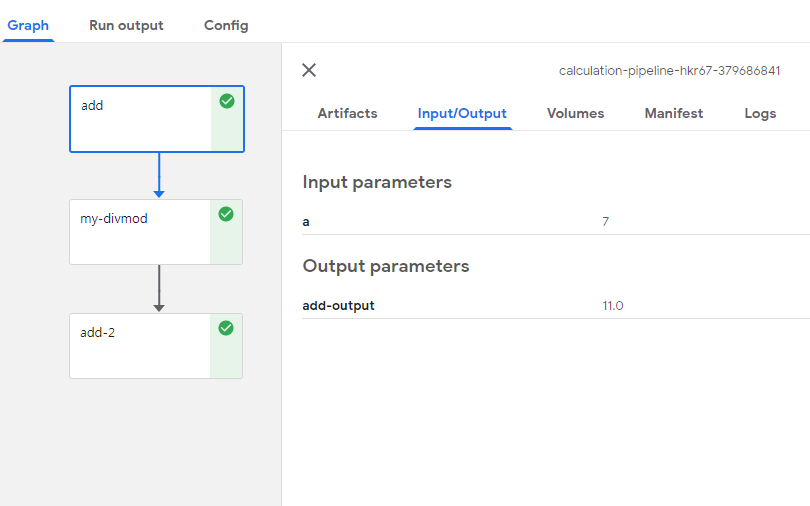
아래 PipeLine의 구성요소를 살펴보면 다음과 같다.
add
Input Parameter로서 argument에서 선언한 a의 값 7이 들어같 것을 확인할 수 있다.
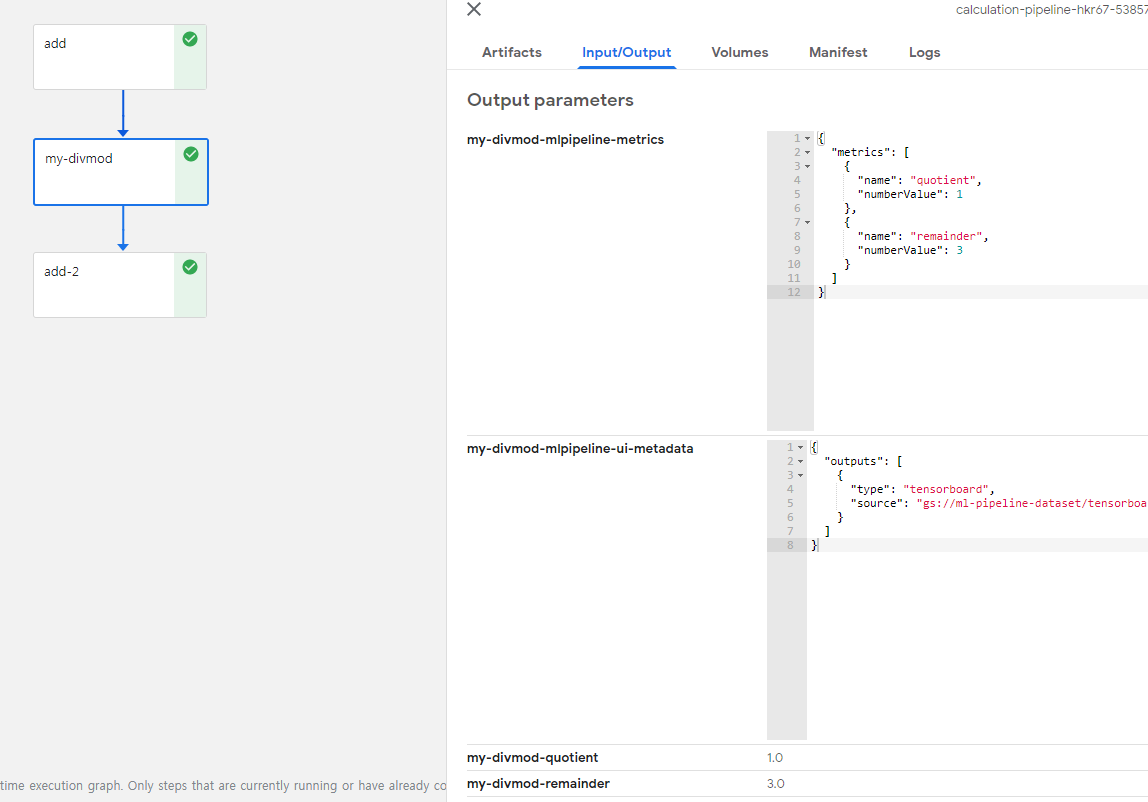
my-divmod
Input Parameter로서 argument에서 add의 결과값과 b값이 들어간 것을 확인할 수 있다.
b의 값이 8이 들어간것으로 보아 처음 Pipeline을 구성할때 선언한 값이 뒤에서 변경하면 변경되어 들어가는 것을 알 수 있다.
또한, Multiple Output의 값이 잘 나오는 것이 확인되었고 json Type으로도 잘 나오는 것을 확인할 수 있다.
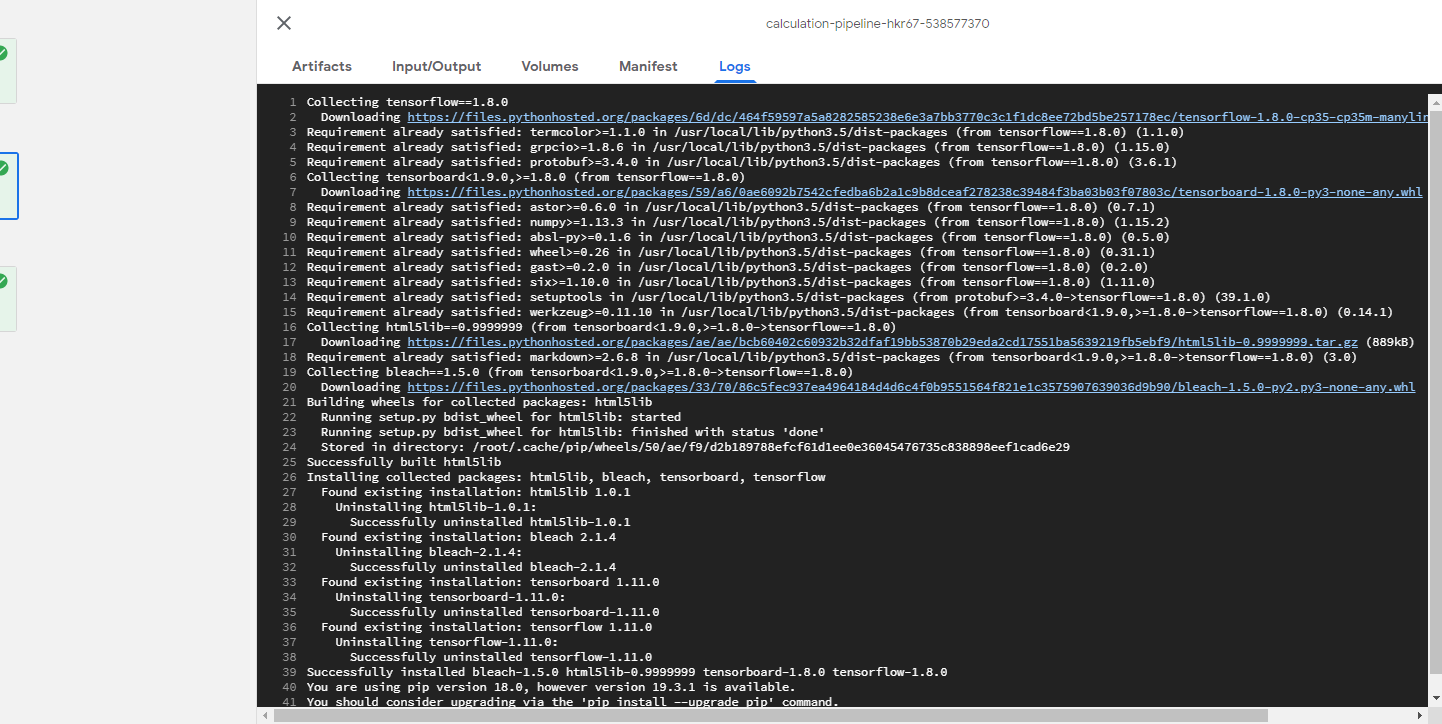
또한 Log를 살펴보게되면 subprocess로 지정한 명령어가 잘 수행중인것을 확인할 수 있다.
add-2
add와 같지만 중요한 것은 딱 하나이다.
result_task = add_op(divmod_task.outputs['quotient'], c): 즉, Multiple Output인 경우 Name으로 지정하여 값을 넣는다는 것을 알 수 있다.
참조:Kubeflow-SDK
코드에 문제가 있거나 궁금한 점이 있으면 wjddyd66@naver.com으로 Mail을 남겨주세요.
Leave a comment