
DeepDream
DeepDream
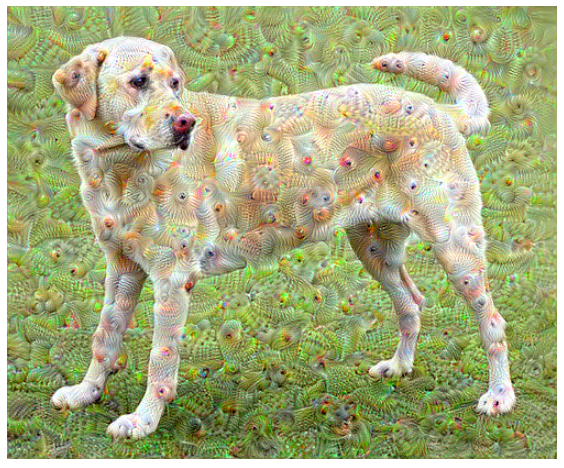
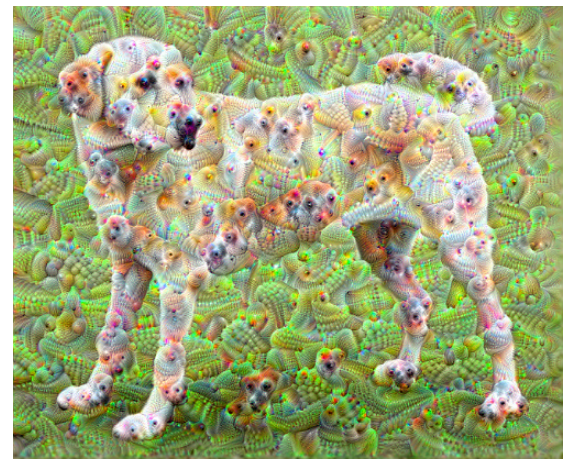
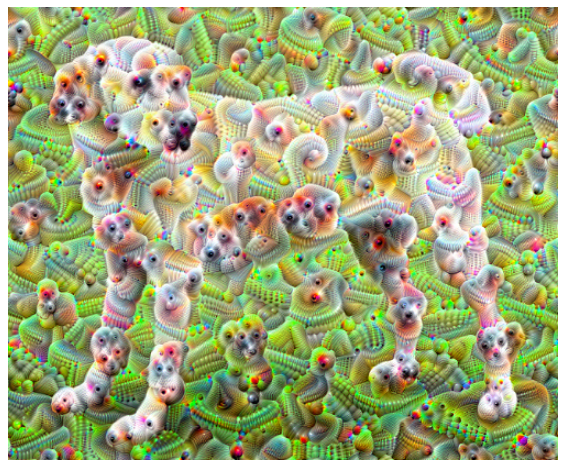
딥드립을 알아보기 전에 먼저 결과를 확인해 보자.
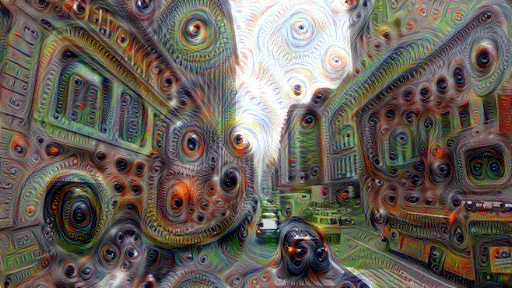
사진 출처: medium.com
Google 에서 발표한 DeepDream이란 결과에서 살펴볼 수 있듯이 Input Image + CNN Filter로서 몽환적인 분위기를 내는 Output Image를 뽑아내는 Model이다.
이러한 Model은 CNN의 특정 Filter를 활성화하여 합침으로 인하여 이루워진다.
Gran-CAM에서 사용한 Gradient Ascent를 사용하여 CNN Filter를 활성화시키고 Heatmap을 합성한 것과 같은 절차를 걸쳐서 Output Image를 생성하게 된다.
Code도 간결하고 논문도 없으니 Code를 살펴보면서 어떻게 구현하였는지 알아보자
DeepDream 구현
Import TensorFlow and other libraries
1
2
3
4
5
6
7
8
9
10
11
12
from __future__ import absolute_import, division, print_function, unicode_literals
import tensorflow as tf
import numpy as np

import matplotlib as mpl

import IPython.display as display
import PIL.Image

from tensorflow.keras.preprocessing import image
import cv2
import matplotlib.pyplot as plt
Load the dataset & Data Preprocessing
URL의 Image를 가져와서 Model에 넣기위한 Function을 정의한다.
아래 Code의 Function은 다음과 같은 의미가 있다.
- download(): URL의 Image를 가져온다.
img.thumbnail를 통하여 Image의 최대 크기를 제한한다. - deprocess(): Image를 Normalization하는 과정이다. 수식이 이해가 되지 않으면 아래에 자세한 내용을 살펴보자.
- show(): Image를 Jupyter의 Ipython을 활용하여 살펴보는 과정이다.
1
2
3
4
5
6
7
8
9
10
11
12
13
14
15
16
17
18
19
20
21
22
23
24
25
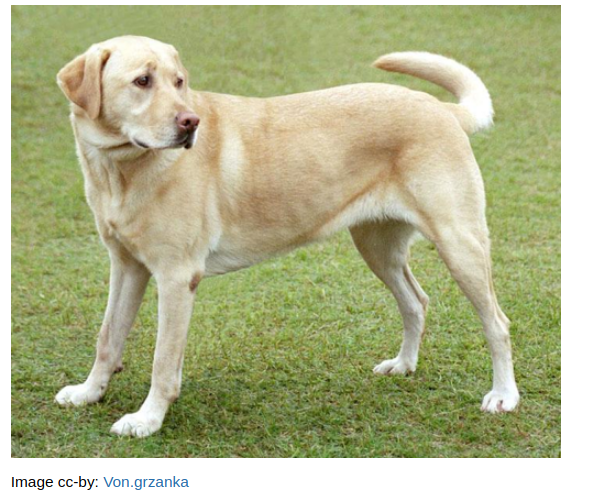
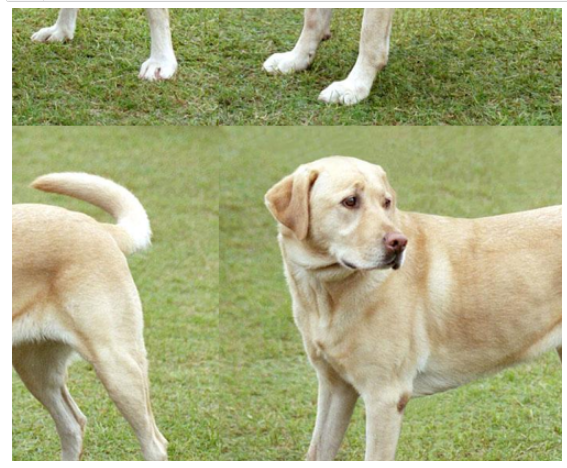
url = 'https://storage.googleapis.com/download.tensorflow.org/example_images/YellowLabradorLooking_new.jpg'
# Download an image and read it into a NumPy array.
def download(url, max_dim=None):
name = url.split('/')[-1]
image_path = tf.keras.utils.get_file(name, origin=url)
img = PIL.Image.open(image_path)
if max_dim:
img.thumbnail((max_dim, max_dim))
return np.array(img)
# Normalize an image
def deprocess(img):
img = 255*(img + 1.0)/2.0
return tf.cast(img, tf.uint8)
# Display an image
def show(img):
display.display(PIL.Image.fromarray(np.array(img)))
# Downsizing the image makes it easier to work with.
original_img = download(url, max_dim=500)
show(original_img)
display.display(display.HTML('Image cc-by: <a "href=https://commons.wikimedia.org/wiki/File:Felis_catus-cat_on_snow.jpg">Von.grzanka</a>'))
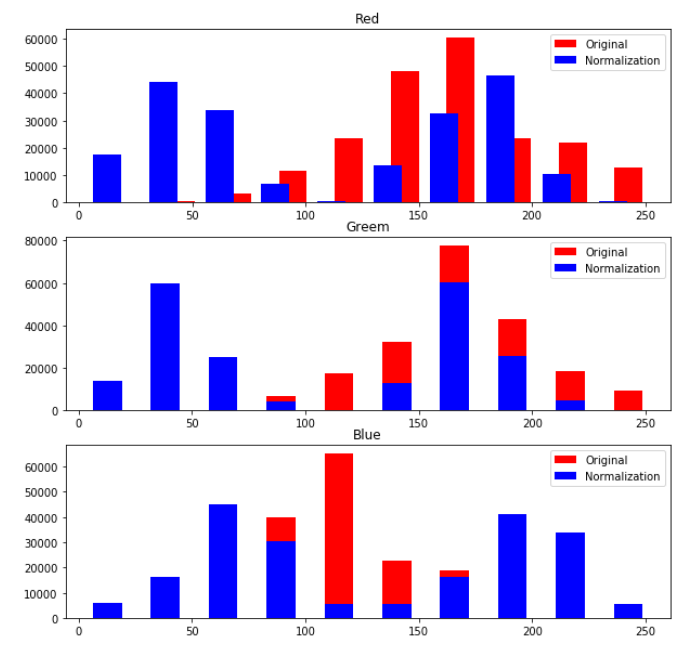
참조사항(Normalization)
위에서의 Nromalization을 하기위한 deprocess()의 수식을 살펴보면 다음과 같다.
$$\text{Uint8_casting(}255*(img+1.0)/2\text{)}$$
위의 수식을 8bit로서 표현하는 것은 많은 어려움이 있고 많은 경우의 수를 계산해야 하므로 4bit로서 표현하여 어떠한 의미를 가지는지 알아보자.
4bit로 표현하기 위하여 바꾼 수식을 다음과 같다.
$$\text{Uint4_casting(}255*(img+1.0)/2\text{)}$$
1
2
3
4
5
6
7
8
9
10
11
12
13
14
15
16
17
18
19
20
21
22
23
24
25
26
27
a = np.arange(16)
b = 15*(a + 1.0)/2.0
c = np.zeros_like(a)

for i in range(16):
    d = hex(int(b[i]))[2:]
    if len(d) == 1:
        if d == 'f':
            c[i] = 15
        else:
            c[i] = d
    else:
        if d[1] == 'a':
            c[i] = 10
        elif d[1] == 'b':
            c[i] = 11
        elif d[1] == 'c':
            c[i] = 12
        elif d[1] == 'd':
            c[i] = 13
        elif d[1] == 'e':
            c[i] = 14
        else:
            c[i] = d[1]

for i in range(16):
    print('Original {} -> Normalization {}'.format(a[i],c[i]))
Original 0 -> Normalization 7
Original 1 -> Normalization 15
Original 2 -> Normalization 6
Original 3 -> Normalization 14
Original 4 -> Normalization 5
Original 5 -> Normalization 13
Original 6 -> Normalization 4
Original 7 -> Normalization 12
Original 8 -> Normalization 3
Original 9 -> Normalization 11
Original 10 -> Normalization 2
Original 11 -> Normalization 10
Original 12 -> Normalization 1
Original 13 -> Normalization 9
Original 14 -> Normalization 0
Original 15 -> Normalization 8
위의 결과를 살펴보게 되면 인접한 숫자(1,2,3 ..)을 멀리 떨어트리는 수식이 된다.
Image의 특성상 인접 Pixel끼리의 값은 비슷하므로 위와 같은 수식을 통하여 Pixel값의 분산값이 커지도록 Nomalization효과가 일어난다.
Normalization Visualization
1
2
3
4
5
6
7
8
9
10
11
12
13
14
15
16
17
18
19
20
21
22
23
24
25
26
27
28
29
30
31
32
33
34
35
36
deprocess_img = deprocess(original_img).numpy()

original_r,original_g,original_b = cv2.split(original_img)
deprocess_r,deprocess_g,deprocess_b = cv2.split(deprocess_img)

original_r = np.array(original_r).flatten()
original_g = np.array(original_g).flatten()
original_b = np.array(original_b).flatten()
print(original_r)

deprocess_r = deprocess_r.flatten()
deprocess_g = deprocess_g.flatten()
deprocess_b = deprocess_b.flatten()

plt.figure(figsize=(10,10))

ax_r = plt.subplot(311)
ax_g = plt.subplot(312)
ax_b = plt.subplot(313)

ax_r.set_title('Red')
ax_r.hist(original_r,label='Original',color='r',rwidth=0.5)
ax_r.hist(deprocess_r,label='Normalization',color='b',rwidth=0.5)
ax_r.legend()

ax_g.set_title('Greem')
ax_g.hist(original_g,label='Original',color='r',rwidth=0.5)
ax_g.hist(deprocess_g,label='Normalization',color='b',rwidth=0.5)
ax_g.legend()

ax_b.set_title('Blue')
ax_b.hist(original_b,label='Original',color='r',rwidth=0.5)
ax_b.hist(deprocess_b,label='Normalization',color='b',rwidth=0.5)
ax_b.legend()

plt.show()
Prepare the feature extraction model
아래는 InceptionV3 Model 중에서 ImageNet을 위하여 Training된 Model을 불러오는 과정이다.
아래 Code를 자세히 살펴보기 위하여 우리가 구성하고자 하는 Model의 최종적인 목적은 몽환적인 분위기의 Image를 Output으로 뽑아내는 것 이다.
이러한 목적을 위하여 Image + CNN Filter로서 구성하게 될 것이다.
따라서 Model은 output을 Classify를 위한 Softmax의 값이 아닌 Feature Map을 뽑아내야 된다.
아래 Code에서는 이러한 과정을 다음과 같이 선언하였다.
tf.keras.Model(inputs=base_model.input, outputs=layers): output을 layers로 선언하여 Activation을 거친 FatureMap을 출력하였다.
또한 DeepDream에서는 InceptionV3 or CNN Model의 Layer선택에 대한 결과를 다음과 같이 설명하였다.
The idea in DeepDream is to choose a layer (or layers) and maximize the “loss” in a way that the image increasingly “excites” the layers. The complexity of the features incorporated depends on layers chosen by you, i.e, lower layers produce strokes or simple patterns, while deeper layers give sophisticated features in images, or even whole objects.
즉, 상위 Layer(CNN의 Input과 가까운 Layer)일수록 Image의 전체적인 Feature를 뽑아내게 될 것이고 이러한 결과는 Simple한 Pattern을 만들어 낼 것이고 몽환적인 분위기는 점점 적어지게 될 것이다.
하위 Layer(CNN의 Output과 가까운 Layer)일수록 Detail하고 정확한 Feature를 뽑아내게 될 것이고 이러한 결과는 몽환적인 분위기를 나타내게 될 것이다.
위의 말을 이해하기 위해서cnn-학습 시각화의 결과를 한번 살펴보자.
VGG 16 block1_conv1 Visualization
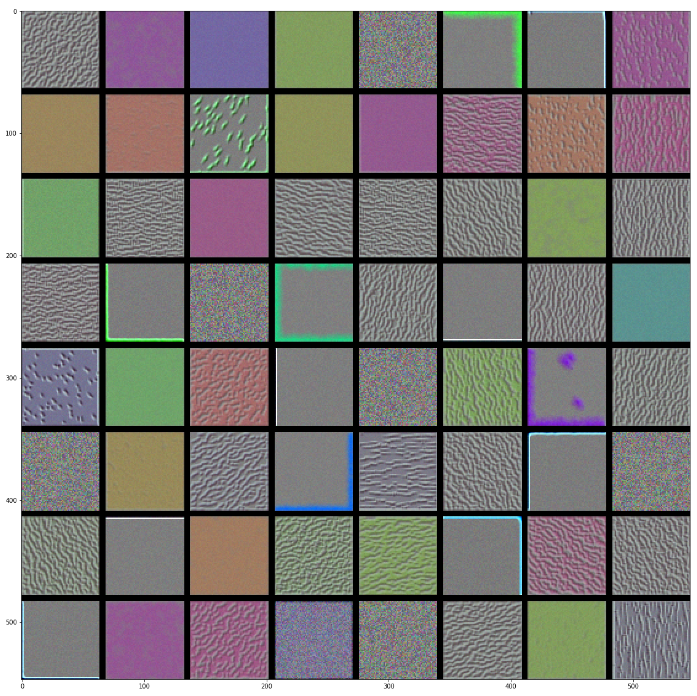
VGG 16 block4_conv1 Visualization
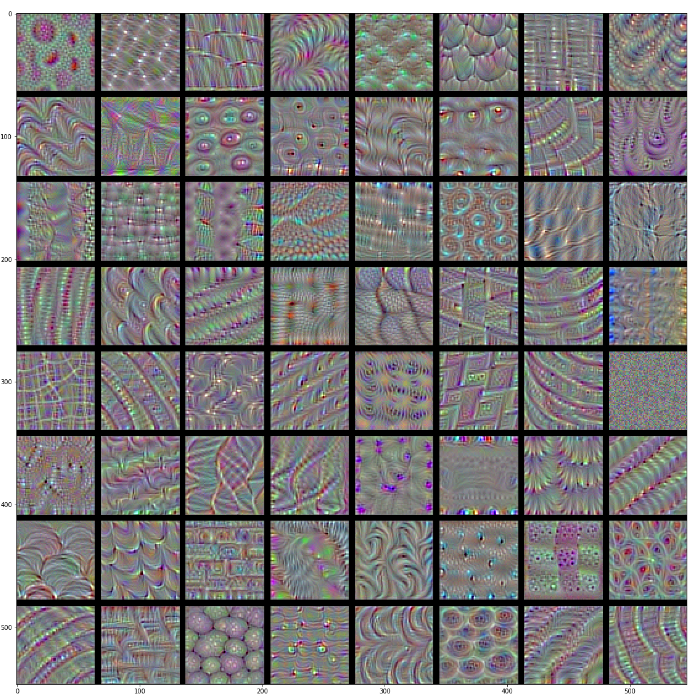
위의 결과에서도 알 수 있듯이 상위 Layer일 수록 전체적인 Feature를 뽑아내게 되고 하위 Layer일 수록 Detail하고 정확한 Feature를 뽑아내는 것을 알 수 있다.
1
2
3
4
5
6
7
8
base_model = tf.keras.applications.InceptionV3(include_top=False, weights='imagenet')

# Maximize the activations of these layers
names = ['mixed3', 'mixed5']
layers = [base_model.get_layer(name).output for name in names]

# Create the feature extraction model
dream_model = tf.keras.Model(inputs=base_model.input, outputs=layers)
Calculate loss
위에서 뽑아낸 각각의 Feature Map에 대한 Loss를 합치는 작업이다.
1
2
3
4
5
6
7
8
9
10
11
12
def calc_loss(img, model):
    # Pass forward the image through the model to retrieve the activations.
    # Converts the image into a batch of size 1.
    img_batch = tf.expand_dims(img, axis=0)
    layer_activations = model(img_batch)

    losses = []
    for act in layer_activations:
        loss = tf.math.reduce_mean(act)
        losses.append(loss)

    return  tf.reduce_sum(losses)
Gradient ascent
이번 DeepDream Model에서 가장 중요한 Algorithm이 들어간 부분이다.
먼저 Gradient Descent의 BackPropagation의 수식을 살펴보면 다음과 같다.
$$\theta = \theta - \alpha \frac{\partial L}{\partial \theta}$$
위의 식을 Gradient Ascent에 맞춰서 바꾸게 되면 다음과 같다.
$$\theta = \theta + \alpha \frac{\partial L}{\partial \theta}$$
아래 Code는 이러한 수식을 적용시키고 Image에서 CNN의 Filter를 최대화 하는(Gradient Ascent를 수행함으로 인해서 최대값)Image를 계속하여 합침으로 인하여 몽환적인 분위기를 내는 Output 을 뽑아내게 된다.
또한 중요한 것은 loss에 대하여 image로서 미분한 값은 Dimension이 같기때문에 다른 작업을 하지 않고 바로 더할 수 있다는 것 이다.
(Tensorflow에서 사용하는 tf.GradientTape()나 input_signature같은 경우에는 Tensorflow 2.0을 정리하면서 다시 한 번 살펴보도록 하겠습니다.)
1
2
3
4
5
6
7
8
9
10
11
12
13
14
15
16
17
18
19
20
21
22
23
24
25
26
27
28
29
30
31
32
33
34
class DeepDream(tf.Module):
    def __init__(self, model):
        self.model = model

    @tf.function(
        input_signature=(
            tf.TensorSpec(shape=[None,None,3], dtype=tf.float32),
            tf.TensorSpec(shape=[], dtype=tf.int32),
            tf.TensorSpec(shape=[], dtype=tf.float32),)
    )
    def __call__(self, img, steps, step_size):
        print("Tracing")
        loss = tf.constant(0.0)
        for n in tf.range(steps):
            with tf.GradientTape() as tape:
                # This needs gradients relative to `img`
                # `GradientTape` only watches `tf.Variable`s by default
                tape.watch(img)
                loss = calc_loss(img, self.model)

            # Calculate the gradient of the loss with respect to the pixels of the input image.
            gradients = tape.gradient(loss, img)

            # Normalize the gradients.
            gradients /= tf.math.reduce_std(gradients) + 1e-8

            # In gradient ascent, the "loss" is maximized so that the input image increasingly "excites" the layers.
            # You can update the image by directly adding the gradients (because they're the same shape!)
            img = img + gradients*step_size
            img = tf.clip_by_value(img, -1, 1)

        return loss, img

deepdream = DeepDream(dream_model)
Main Loop
위에서 정의한 DeepDream Model을 통하여 Training을 진행하고 결과를 출력하는 과정이다.
1
2
3
4
5
6
7
8
9
10
11
12
13
14
15
16
17
18
19
20
21
22
23
24
25
26
27
28
29
def run_deep_dream_simple(img, steps=100, step_size=0.01):
    # Convert from uint8 to the range expected by the model.
    img = tf.keras.applications.inception_v3.preprocess_input(img)
    img = tf.convert_to_tensor(img)
    step_size = tf.convert_to_tensor(step_size)
    steps_remaining = steps
    step = 0

    while steps_remaining:
        if steps_remaining>100:
            run_steps = tf.constant(100)
        else:
            run_steps = tf.constant(steps_remaining)

        steps_remaining -= run_steps
        step += run_steps

        loss, img = deepdream(img, run_steps, tf.constant(step_size))

        display.clear_output(wait=True)
        show(deprocess(img))
        print ("Step {}, loss {}".format(step, loss))


    result = deprocess(img)
    display.clear_output(wait=True)
    show(result)

    return result
Check The Result
1
dream_img = run_deep_dream_simple(img=original_img, steps=100, step_size=0.01)
Taking it up an octave
위의 과정도 충분히 몽환적인 느낌으로서 잘 표현한 그림이지만 Tensorflow 2.0 Guide에서는 다음과 같이 한계점을 지적하고 있다.
- The output is noisy (this could be addressed with a tf.image.total_variation loss).
- The image is low resolution.
- The patterns appear like they’re all happening at the same granularity.
위와 같은 단순하고 반복적인 결과를 탈출하기 위하여 StyleTransfer와 같이 Image의 전체적인 부분붜 큰 부분까지의 Style을 적용시키는 것은 Octave를 구성함으로써 구현하였다.
참고사항(Octave)
Octave란 하나의 이미지에 대해서 Scale을 다르게 하여 구성한 Image Pyramid를 의미하게 된다.
이러한 기법은 Image의 작은 부분뿐만아니라 전체적인 분위기를 뽑아내는데 사용하기도 하고(Style Transfer에서는 Input Image에 대하여 Octave를 구성한 것이 아니라 Style Layer에서의 Feature Map에 대하여 Octave를 구성하였다고 생각할 수 있따.) 특정 Feature를 찾아내는 기법에서는 Scale에 불변한 Image를 찾기 위해서 적용되기도 한다.
아래 링크는 Ocatave를 활용하여 크기와 회전에 불변하는 Feature를 찾는 방법이다.
SIFT 특징 검출 및 디스크립터 계산Permalink
1
2
3
4
5
6
7
8
9
10
11
12
13
14
15
16
17
18
19
20
21
22
23
import time
start = time.time()

OCTAVE_SCALE = 1.30

img = tf.constant(np.array(original_img))
base_shape = tf.shape(img)[:-1]
float_base_shape = tf.cast(base_shape, tf.float32)

for n in range(-2, 3):
    new_shape = tf.cast(float_base_shape*(OCTAVE_SCALE**n), tf.int32)

    img = tf.image.resize(img, new_shape).numpy()

    img = run_deep_dream_simple(img=img, steps=50, step_size=0.01)

display.clear_output(wait=True)
img = tf.image.resize(img, base_shape)
img = tf.image.convert_image_dtype(img/255.0, dtype=tf.uint8)
show(img)

end = time.time()
end-start
Optional: Scaling up with tiles
Google 에서 위와같이 Octave를 구성하는 것은 다음과 같은 단점이 있다고 설명한다.
One thing to consider is that as the image increases in size, so will the time and memory necessary to perform the gradient calculation. The above octave implementation will not work on very large images, or many octaves.
즉, Image의 크기가 커질수록 Gradient Ascent의 과정은 커지게 되고 CPU와 GPU등 Computer Resource를 많이 잡아먹게 된다.
따라서 아래의 과정은 이러한 Image를 Random한 Size로서 분할하고 분할로 인하여 작아진 Image들에 대하여 DeepDream과정을 거치고 다시 원래되로 복구하여 결과를 살펴보는 과정이다.
1
2
3
4
5
6
7
8
9
def random_roll(img, maxroll):
    # Randomly shift the image to avoid tiled boundaries.
    shift = tf.random.uniform(shape=[2], minval=-maxroll, maxval=maxroll, dtype=tf.int32)
    shift_down, shift_right = shift[0],shift[1]
    img_rolled = tf.roll(tf.roll(img, shift_right, axis=1), shift_down, axis=0)
    return shift_down, shift_right, img_rolled

shift_down, shift_right, img_rolled = random_roll(np.array(original_img), 512)
show(img_rolled)
A tiled equivalent of the deepdream function defined earlier:
1
2
3
4
5
6
7
8
9
10
11
12
13
14
15
16
17
18
19
20
21
22
23
24
25
26
27
28
29
30
31
32
33
34
35
36
37
38
39
40
41
42
43
44
45
46
47
class TiledGradients(tf.Module):
    def __init__(self, model):
        self.model = model

    @tf.function(
        input_signature=(
            tf.TensorSpec(shape=[None,None,3], dtype=tf.float32),
            tf.TensorSpec(shape=[], dtype=tf.int32),))

    def __call__(self, img, tile_size=512):
        shift_down, shift_right, img_rolled = random_roll(img, tile_size)

        # Initialize the image gradients to zero.
        gradients = tf.zeros_like(img_rolled)

        # Skip the last tile, unless there's only one tile.
        xs = tf.range(0, img_rolled.shape[0], tile_size)[:-1]
        if not tf.cast(len(xs), bool):
            xs = tf.constant([0])
        ys = tf.range(0, img_rolled.shape[1], tile_size)[:-1]
        if not tf.cast(len(ys), bool):
            ys = tf.constant([0])

        for x in xs:
            for y in ys:
                # Calculate the gradients for this tile.
                with tf.GradientTape() as tape:
                    # This needs gradients relative to `img_rolled`.
                    # `GradientTape` only watches `tf.Variable`s by default.
                    tape.watch(img_rolled)

                    # Extract a tile out of the image.
                    img_tile = img_rolled[x:x+tile_size, y:y+tile_size]
                    loss = calc_loss(img_tile, self.model)

                # Update the image gradients for this tile.
                gradients = gradients + tape.gradient(loss, img_rolled)

        # Undo the random shift applied to the image and its gradients.
        gradients = tf.roll(tf.roll(gradients, -shift_right, axis=1), -shift_down, axis=0)

        # Normalize the gradients.
        gradients /= tf.math.reduce_std(gradients) + 1e-8

        return gradients

get_tiled_gradients = TiledGradients(dream_model)
A scalable, octave-aware deepdream implementation
1
2
3
4
5
6
7
8
9
10
11
12
13
14
15
16
17
18
19
20
21
22
23
24
25
26
27
28
29
30
31
32
33
def run_deep_dream_with_octaves(img, steps_per_octave=100, step_size=0.01,
                                octaves=range(-2,3), octave_scale=1.3):
    base_shape = tf.shape(img)
    img = tf.keras.preprocessing.image.img_to_array(img)
    img = tf.keras.applications.inception_v3.preprocess_input(img)

    initial_shape = img.shape[:-1]
    img = tf.image.resize(img, initial_shape)

    for octave in octaves:
        # Scale the image based on the octave
        new_size = tf.cast(tf.convert_to_tensor(base_shape[:-1]), tf.float32)*(octave_scale**octave)
        img = tf.image.resize(img, tf.cast(new_size, tf.int32))

        for step in range(steps_per_octave):
            gradients = get_tiled_gradients(img)
            img = img + gradients*step_size
            img = tf.clip_by_value(img, -1, 1)

            if step % 10 == 0:
                display.clear_output(wait=True)
                show(deprocess(img))
                print ("Octave {}, Step {}".format(octave, step))

    result = deprocess(img)
    return result

img = run_deep_dream_with_octaves(img=original_img, step_size=0.01)

display.clear_output(wait=True)
img = tf.image.resize(img, base_shape)
img = tf.image.convert_image_dtype(img/255.0, dtype=tf.uint8)
show(img)
참조: 원본코드
참조: Tensorflow2.0 DeepDream
코드에 문제가 있거나 궁금한 점이 있으면 wjddyd66@naver.com으로 Mail을 남겨주세요.
Leave a comment