Time series forcasting
Time series forcasting
Tensorflow 2.0에 맞게 다시 Tensorflow를 살펴볼 필요가 있다고 느껴져서 Tensorflow 정식 홈페이지에 나와있는 예제부터 전반적인 Tensorflow 사용법을 먼저 익히는 Post가 된다.
필요한 Library Import
1
2
3
4
5
6
7
8
9
10
11
12
13
14
from __future__ import absolute_import, division, print_function, unicode_literals
import tensorflow as tf

import matplotlib as mpl
import matplotlib.pyplot as plt
import numpy as np
import os
import pandas as pd
import io
import requests

# Matplotlib Setting
mpl.rcParams['figure.figsize'] = (8, 6)
mpl.rcParams['axes.grid'] = False
Goal
이번 Post의 목적은 다음과 같다.
- Time Series Data를 다루는 방법을 익힌다.
- RNN을 통하여 Time Series Data를 예측하는 Model을 만든다.
What is Time Series?
시계열은 일정 시간 간격으로 배치된 데이터들의 수열이라고 말한다. 이러한 시계열 데이터들을 예측하는 방법은 다양하게 존재한다.
사진으로 표현하면 다음과 같다.

사진출처:wikipedia
이러한 Time Series분석을 위해 많이 사용되는 방법이 RNN이다.
RNN에 대하여 설명한 것을 다시 살펴보면 RNN이란 순차적인 정보를 처리하는데 유용하다. 즉, 상관없는 두 변수간의 값으로 인한 정보를 처리하는 것이 아닌 한 정보에 대한 특정 Domain의 값을 나타내는 정보를 처리하는 것 이다.
이러한 특성때문에 Time Series or NLP분야에서 많이 사용되는 기법이다.
The weather dataset
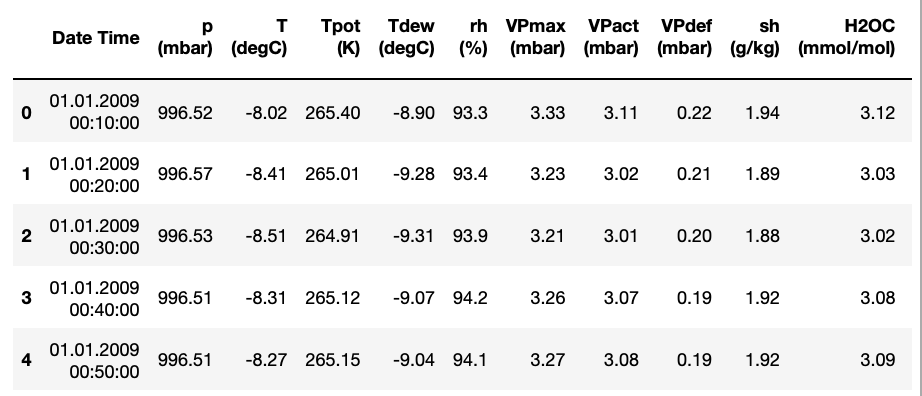
이번 Post에서 다뤄볼 Time Series Dataset은 weather time series dataset이다.
이러한 Dataset은 14개의 서로 다른 Columns를 가지고 있고, 2003 ~ 10분 마다 기록된 Dataset이다.
1
2
3
4
5
6
7
8
9
10
# Dataset Download
zip_path = tf.keras.utils.get_file(
    origin='https://storage.googleapis.com/tensorflow/tf-keras-datasets/jena_climate_2009_2016.csv.zip',
    fname='jena_climate_2009_2016.csv.zip',
    extract=True)
csv_path, _ = os.path.splitext(zip_path)

# Check Dataset
df = pd.read_csv(csv_path)
df.head()
1
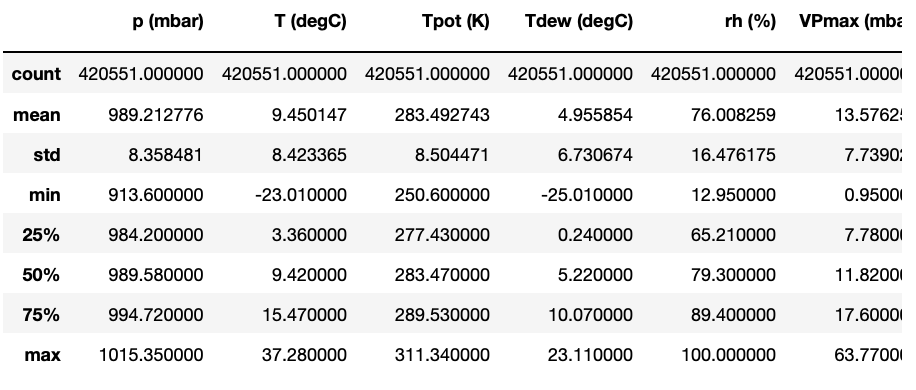
df.describe()
Make Function for datasets as you want that has univariate_data
위의 TimeSeries Dataset을 살펴보면 알 수 있듯이 총 420551개의 Row가 존재하게 된다.
이러한 많은 Dataset을 다 활용하지 않고 원하는 만큼의 Dataset을 가져올 수 있게 Function을 만들어서 사용한다.
지금 만드는 Function은 Dataset의 많은 Column중 하나만을 가져올 때 사용하는 함수이다.
함수의 사용한 주요 Argument는 다음과 같다.
- history_size: the size of the past window of information
- target_size: how far in the future does the model need to learn to predict
즉, Model에 Input으로 들어가게 되는 Dataset을 살펴보게 되면 다음과 같다.
- Range: start_index ~ end_index
- Train: x ~ y, x-y = history_size
- Label: y + target_size
1
2
3
4
5
6
7
8
9
10
11
12
13
14
15
16
17
18
19
20
21
22
# Function for datasets as you want that has univariate_data
def univariate_data(dataset, start_index, end_index, history_size, target_size):
    data = []
    labels = []

    start_index = start_index + history_size
    if end_index is None:
        end_index = len(dataset) - target_size

    for i in range(start_index, end_index):
        indices = range(i-history_size, i)
        # Train: x ~ y, x-y = history_size
        data.append(np.reshape(dataset[indices], (history_size, 1)))
        # Label: y + target_size
        labels.append(dataset[i+target_size])
    return np.array(data), np.array(labels)


# HyperParameter Setting
TRAIN_SPLIT = 300000
# Random Seed Setting
tf.random.set_seed(13)
Forecast a univariate time series
실제 Model이 TimeSeries Data를 가지고 예측 하는 것을 만들는 것을 목표로 한다. 처음 만드는 Model은 하나의 변수만을 가지고 예측하는 것 이다.
Visualiation the Data that has univariate
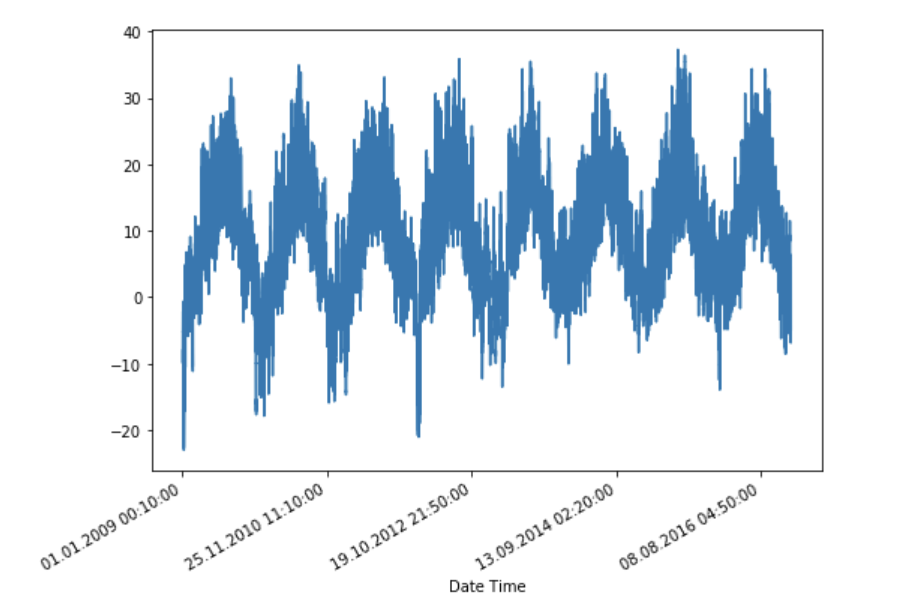
TimeSeries Data가 가지고 있는 많은 변수중에서 하나의 변수에 대해서 Visualization하여 확인해 본다.
1
2
3
4
5
uni_data = df['T (degC)']
uni_data.index = df['Date Time']

# Check the univariate
uni_data.head()
Date Time
01.01.2009 00:10:00   -8.02
01.01.2009 00:20:00   -8.41
01.01.2009 00:30:00   -8.51
01.01.2009 00:40:00   -8.31
01.01.2009 00:50:00   -8.27
Name: T (degC), dtype: float64
1
2
# Visualization the univariate
uni_data.plot(subplots=True)
DataPreprocessing
실제 Data를 Model에 넣을 Tensor로 변환하기 전에 Normalization과정을 실시하는 데이터 전처리 과정을 거친다.
1
2
3
4
5
6
7
8
9
10
11
12
13
14
15
16
17
18
19
20
21
22
23
24
uni_data = uni_data.values

# Z-Normalization
uni_train_mean = uni_data[:TRAIN_SPLIT].mean()
uni_train_std = uni_data[:TRAIN_SPLIT].std()
uni_data = (uni_data-uni_train_mean)/uni_train_std

# Use Customizing Function
univariate_past_history = 20
univariate_future_target = 0

x_train_uni,y_train_uni = univariate_data(uni_data,0,TRAIN_SPLIT,
                                         univariate_past_history,
                                         univariate_future_target)

x_val_uni,y_val_uni = univariate_data(uni_data,TRAIN_SPLIT,None,
                                     univariate_past_history,
                                     univariate_future_target)

# Check the Data
print('Single window of past history')
print(x_train_uni[0])
print('Target temperature to predict')
print(y_train_uni[0])
Single window of past history
[[-1.99766294]
 [-2.04281897]
 [-2.05439744]
 [-2.0312405 ]
 [-2.02660912]
 [-2.00113649]
 [-1.95134907]
 [-1.95134907]
 [-1.98492663]
 [-2.04513467]
 [-2.08334362]
 [-2.09723778]
 [-2.09376424]
 [-2.09144854]
 [-2.07176515]
 [-2.07176515]
 [-2.07639653]
 [-2.08913285]
 [-2.09260639]
 [-2.10418486]]
Target temperature to predict
-2.1041848598100876
Visualization the Predict
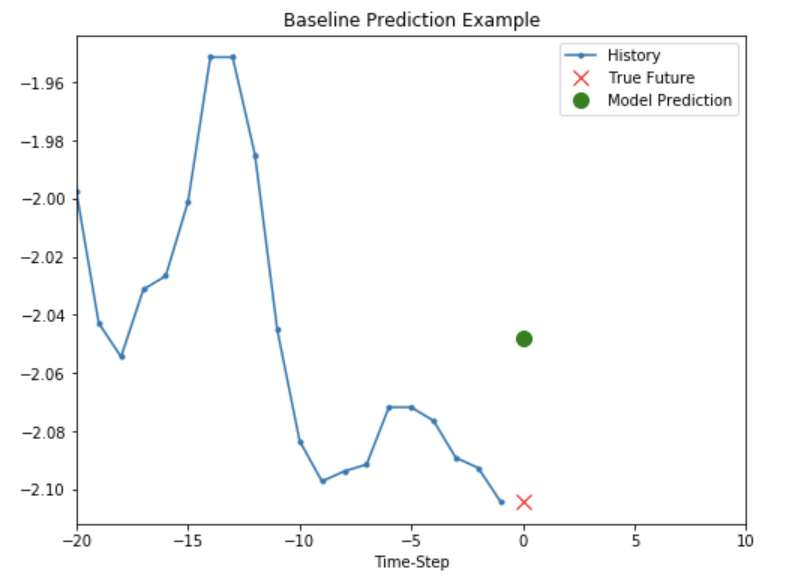
실제 Model의 예측 결과를 Visualization하기 위하여 간단한 Function을 만든다.
사용되는 각각의 Argument는 다음과 같다.
- plot_data: Input+Label+Model Prediction
- delta: Time Range
- title: Tile of Plot
실제 Model은 아직 구성하지 않았으므로 평균값으로서 간단히 나타내면 다음과 같다.
참조
밑의 반복문을 살펴보면 처음보는 방식으로 되어있었다.
Python에서는 0은 False, 나머지는 전부 True로 판단한다.
1
2
3
4
5
6
7
8
9
10
11
12
13
14
15
16
17
18
19
20
21
22
23
24
25
26
27
28
29
30
31
32
33
34
35
# Input Time Range
def create_time_steps(length):
    return list(range(-length, 0))

# Visualization the Predict
def show_plot(plot_data, delta, title):
    labels = ['History', 'True Future', 'Model Prediction']
    marker = ['.-', 'rx', 'go']
    time_steps = create_time_steps(plot_data[0].shape[0])

    if delta:
        future = delta
    else:
        future = 0

    plt.title(title)

    for i, x in enumerate(plot_data):
        if i:
            plt.plot(future, plot_data[i], marker[i], markersize=10,
               label=labels[i])
        else:
            plt.plot(time_steps, plot_data[i].flatten(), marker[i], label=labels[i])

    plt.legend()
    plt.xlim([time_steps[0], (future+5)*2])
    plt.xlabel('Time-Step')
    return plt

# Check the Visualization the Predict
def baseline(history):
    return np.mean(history)

show_plot([x_train_uni[0], y_train_uni[0], baseline(x_train_uni[0])], 0,
           'Baseline Prediction Example')
Recurrent neural network
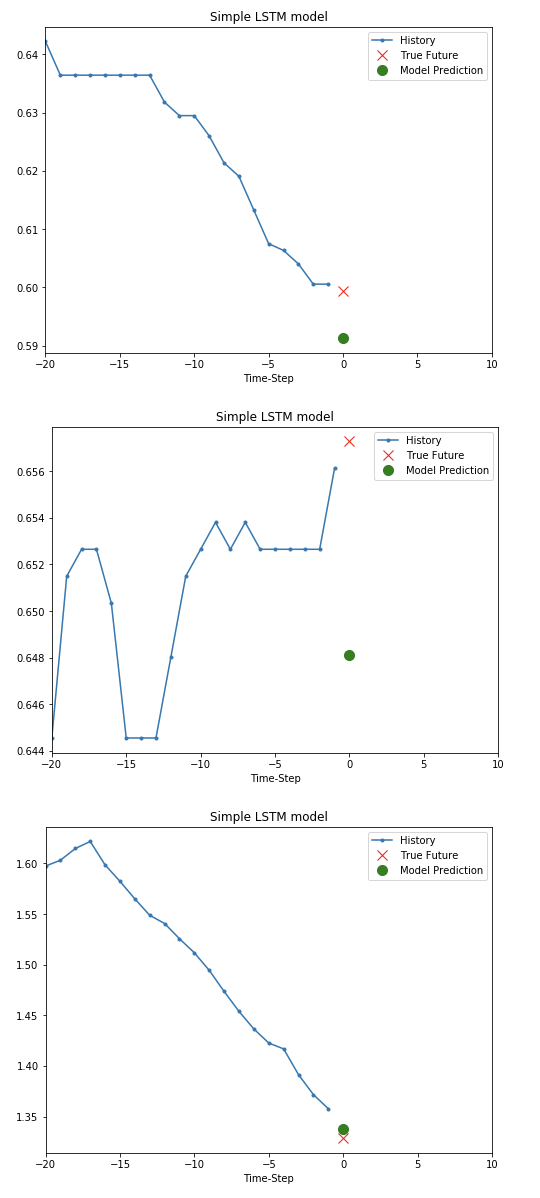
Keras를 사용하여 RNN의 Model중에서도 LSTM을 사용하여 Model을 구성하고 결과를 확인한다.
어렵지 않은 부분이므로 아래 Code가 이해되지 않으면 링크를 참조하자.
참조: Keras-텍스트와 시퀀스를 위한 딥러닝
1
2
3
4
5
6
7
8
9
10
11
12
13
14
15
16
17
18
19
20
21
22
23
24
25
26
27
28
29
30
31
32
33
34
# Hyperparameter Setting
BATCH_SIZE = 256
BUFFER_SIZE = 10000

# Dataset -> Tensor
train_univariate = tf.data.Dataset.from_tensor_slices((x_train_uni, y_train_uni))
train_univariate = train_univariate.cache().shuffle(BUFFER_SIZE).batch(BATCH_SIZE).repeat()

val_univariate = tf.data.Dataset.from_tensor_slices((x_val_uni, y_val_uni))
val_univariate = val_univariate.batch(BATCH_SIZE).repeat()

# Build Simple LSTM Model
simple_lstm_model = tf.keras.models.Sequential([
    tf.keras.layers.LSTM(8, input_shape=x_train_uni.shape[-2:]),
    tf.keras.layers.Dense(1)
])

simple_lstm_model.compile(optimizer='adam', loss='mae')

# Train the Model
EVALUATION_INTERVAL = 200
EPOCHS = 10

simple_lstm_model.fit(train_univariate, epochs=EPOCHS,
                      steps_per_epoch=EVALUATION_INTERVAL,
                      validation_data=val_univariate,
                      validation_steps=50,
                     verbose=0)

# Visualization the Model Predict
for x, y in val_univariate.take(3):
    plot = show_plot([x[0].numpy(), y[0].numpy(),
                    simple_lstm_model.predict(x)[0]], 0, 'Simple LSTM model')
    plot.show()
Forecast a multivariate time series
위의 날씨 Data를 살펴보면 14개의 Columns가 존재한다. 위에서는 하나의 Columns를 가지고 예측하였지만 이번에는 여러개의 Columns를 가지고 결과를 예측하는 것을 확인한다.
Check the dataset
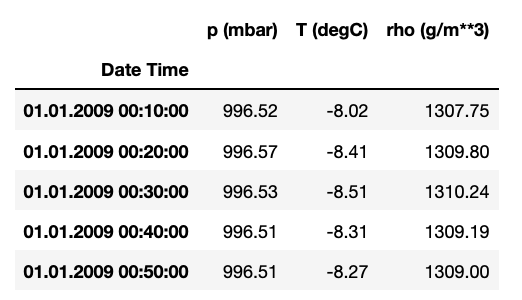
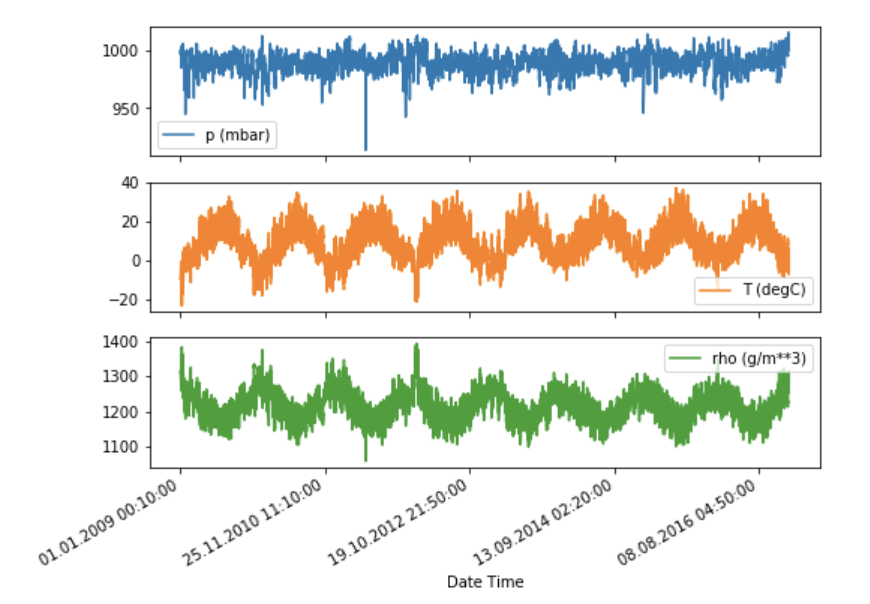
사용하고자하는 Dataset의 여러가지 변수를 살펴보고 그 결과를 Visualziation하여 확인한다.
1
2
3
4
5
6
7
# Select the Columns
features_considered = ['p (mbar)', 'T (degC)', 'rho (g/m**3)']

# Check the dataset
features = df[features_considered]
features.index = df['Date Time']
features.head()
1
2
# Visualization the dataset
features.plot(subplots=True)
Single Step Model
앞으로의 Single Step Model과 Multi Step Model에서 동시에 사용할 Function들을 정의한다.
- Single Step Model: Model의 Prediction이 어느 특정 한 부분만을 예측한다.
- Multi Step Model: Model의 Prediction이 어느 특정 한 부분을 예측하는 것이 아닌 지정한 범위의 값을 예측한다.
Data Preprocessing
Univariate Model처럼 먼저 Model에 넣기 전에 데이터 전처리 과정을 실시한다.
1
2
3
4
5
6
7
8
9
10
11
12
13
14
15
16
17
18
19
20
21
22
23
24
25
26
27
28
# Z-Normalization
dataset = features.values
# axis = 0 Because of Multivariate
data_mean = dataset[:TRAIN_SPLIT].mean(axis=0)
data_std = dataset[:TRAIN_SPLIT].std(axis=0)
dataset = (dataset-data_mean)/data_std

# Use Customizing Function for Single Step & Multi Step Model
def multivariate_data(dataset, target, start_index, end_index, history_size,
                      target_size, step, single_step=False):
    data = []
    labels = []

    start_index = start_index + history_size
    if end_index is None:
        end_index = len(dataset) - target_size

    for i in range(start_index, end_index):
        indices = range(i-history_size, i, step)
        data.append(dataset[indices])

        if single_step:
            labels.append(target[i+target_size])

        else:
            labels.append(target[i:i+target_size])

    return np.array(data), np.array(labels)
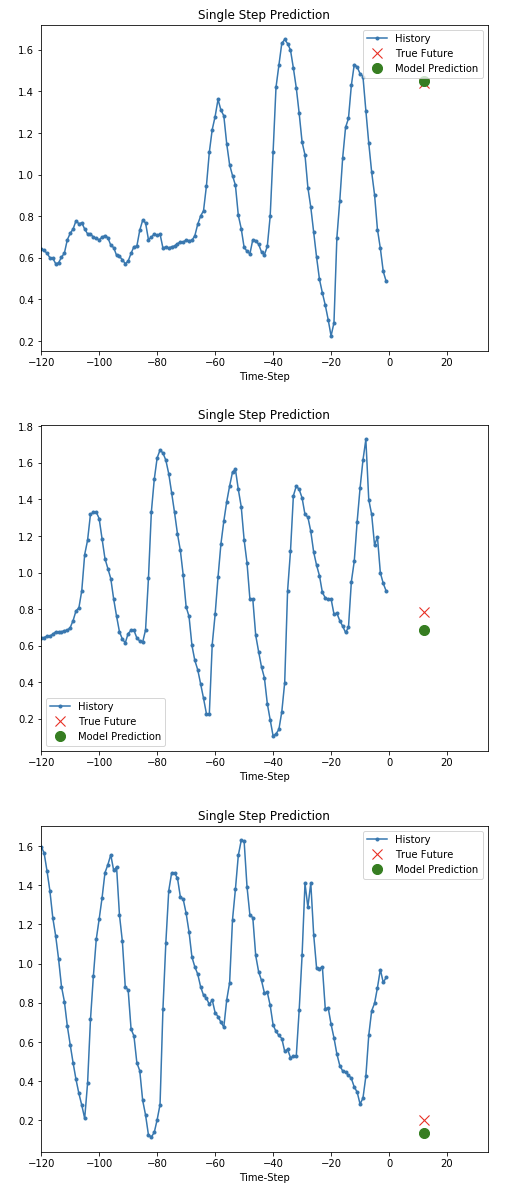
Build the Single Step Model & Visualization Predict
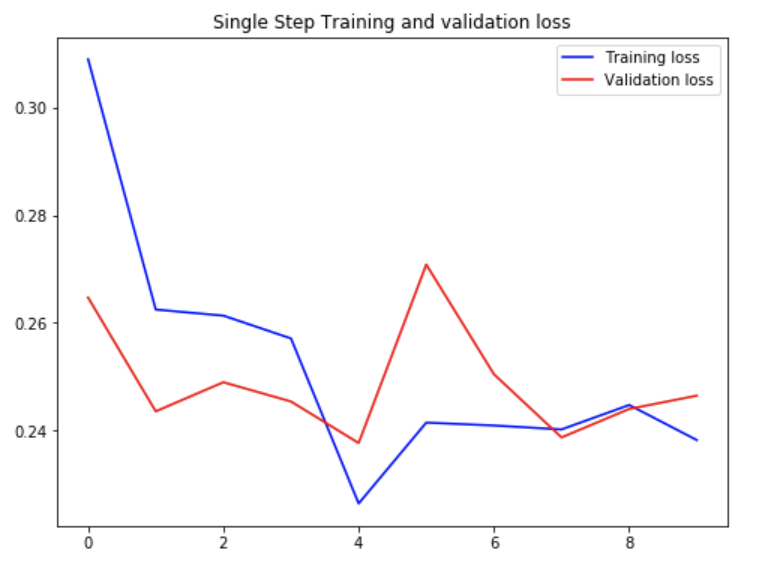
실제 LSTM Model로서 다변량의 변수를 입력으로 넣고 Single Step을 Prediction하는 Model의 결과를 Visualization하여 확인한다.
1
2
3
4
5
6
7
8
9
10
11
12
13
14
15
16
17
18
19
20
21
22
23
24
25
26
27
28
29
30
31
32
33
34
35
36
37
38
39
40
41
42
43
44
45
46
47
48
49
50
51
52
53
54
55
# Hyperparameter Setting
past_history = 720
future_target = 72
STEP = 6

# Use Customizing Function
x_train_single, y_train_single = multivariate_data(dataset, dataset[:, 1], 0,
                                                   TRAIN_SPLIT, past_history,
                                                   future_target, STEP,
                                                   single_step=True)
x_val_single, y_val_single = multivariate_data(dataset, dataset[:, 1],
                                               TRAIN_SPLIT, None, past_history,
                                               future_target, STEP,
                                               single_step=True)

# Dataset -> Tensor
train_data_single = tf.data.Dataset.from_tensor_slices((x_train_single, y_train_single))
train_data_single = train_data_single.cache().shuffle(BUFFER_SIZE).batch(BATCH_SIZE).repeat()

val_data_single = tf.data.Dataset.from_tensor_slices((x_val_single, y_val_single))
val_data_single = val_data_single.batch(BATCH_SIZE).repeat()

# Build the Single Step Model
single_step_model = tf.keras.models.Sequential([
    tf.keras.layers.LSTM(32, input_shape=x_train_single.shape[-2:]),
    tf.keras.layers.Dense(1)
])

single_step_model.compile(optimizer=tf.keras.optimizers.RMSprop(), loss='mae')

# Train the Model
single_step_history = single_step_model.fit(train_data_single, epochs=EPOCHS,
                                            steps_per_epoch=EVALUATION_INTERVAL,
                                            validation_data=val_data_single,
                                            validation_steps=50,
                                           verbose=0)

# Visualization the Model Loss
def plot_train_history(history, title):
    loss = history.history['loss']
    val_loss = history.history['val_loss']

    epochs = range(len(loss))

    plt.figure()

    plt.plot(epochs, loss, 'b', label='Training loss')
    plt.plot(epochs, val_loss, 'r', label='Validation loss')
    plt.title(title)
    plt.legend()

    plt.show()

plot_train_history(single_step_history,
                   'Single Step Training and validation loss')
1
2
3
4
5
6
7
8
# Visualization the Model Prediction
# x - p(mbar), T(degC), rho(g/m**3)
# y - T(degC)
for x, y in val_data_single.take(3):
    plot = show_plot([x[0][:, 1].numpy(), y[0].numpy(),
                    single_step_model.predict(x)[0]], 12,
                   'Single Step Prediction')
    plot.show()
Multi-Step model
특정 한 Point가 아닌 주어진 구간동안에 결과값을 Prediction하여야 한다.
해결 방법은 생각보다 간단하다.
기존 Single Step Model은 하나의 Point만 구하면 되었으므로 Model의 Output을 tf.keras.layers(1)로서 구현하였다. Multi-Step Model의 경우 원하는 구간만큼의 Output을 지정하면 된다.
1
2
3
4
5
6
7
8
9
10
11
12
13
14
15
16
17
18
19
20
21
22
23
24
25
26
27
28
29
30
31
32
33
34
35
36
37
38
39
40
41
# Prepare Dataset that splited to train, label
future_target = 72
x_train_multi, y_train_multi = multivariate_data(dataset, dataset[:, 1], 0,
                                                 TRAIN_SPLIT, past_history,
                                                 future_target, STEP)
x_val_multi, y_val_multi = multivariate_data(dataset, dataset[:, 1],
                                             TRAIN_SPLIT, None, past_history,
                                             future_target, STEP)

# Dataset -> Tensor
train_data_multi = tf.data.Dataset.from_tensor_slices((x_train_multi, y_train_multi))
train_data_multi = train_data_multi.cache().shuffle(BUFFER_SIZE).batch(BATCH_SIZE).repeat()

val_data_multi = tf.data.Dataset.from_tensor_slices((x_val_multi, y_val_multi))
val_data_multi = val_data_multi.batch(BATCH_SIZE).repeat()

# Function that plot multi-step Model
def multi_step_plot(history, true_future, prediction):
    plt.figure(figsize=(12, 6))
    num_in = create_time_steps(len(history))
    num_out = len(true_future)

    plt.plot(num_in, np.array(history[:, 1]), label='History')
    plt.plot(np.arange(num_out)/STEP, np.array(true_future), 'bo',
           label='True Future')
    if prediction.any():
        plt.plot(np.arange(num_out)/STEP, np.array(prediction), 'ro',
             label='Predicted Future')
    plt.legend(loc='upper left')
    plt.show()

# Build the Multi Step Model
multi_step_model = tf.keras.models.Sequential([
    tf.keras.layers.LSTM(32,
                         return_sequences=True,
                         input_shape=x_train_multi.shape[-2:]),
    tf.keras.layers.LSTM(16,activation='relu'),
    tf.keras.layers.Dense(72)
])

multi_step_model.compile(optimizer=tf.keras.optimizers.RMSprop(clipvalue=1.0), loss='mae')
Train & Visualization the Result
1
2
3
4
5
6
7
8
9
# Train the Model
multi_step_history = multi_step_model.fit(train_data_multi, epochs=EPOCHS,
                                          steps_per_epoch=EVALUATION_INTERVAL,
                                          validation_data=val_data_multi,
                                          validation_steps=50,
                                         verbose=0)

# Visualization Loss
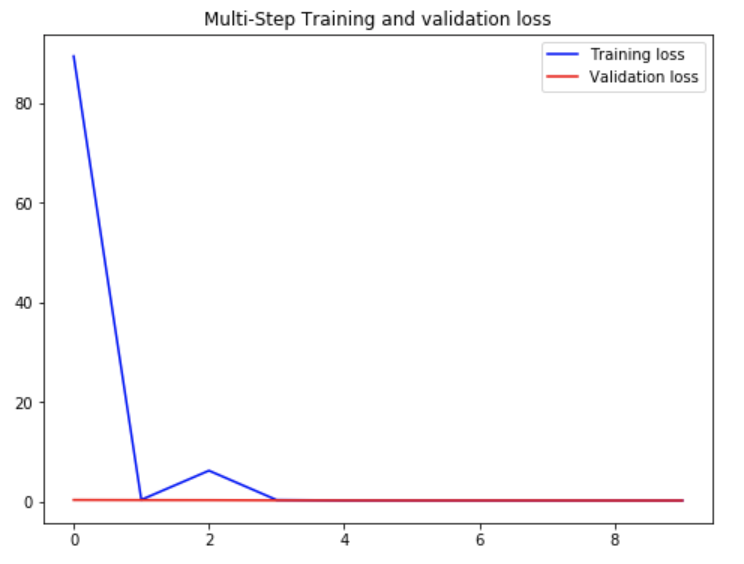
plot_train_history(multi_step_history, 'Multi-Step Training and validation loss')
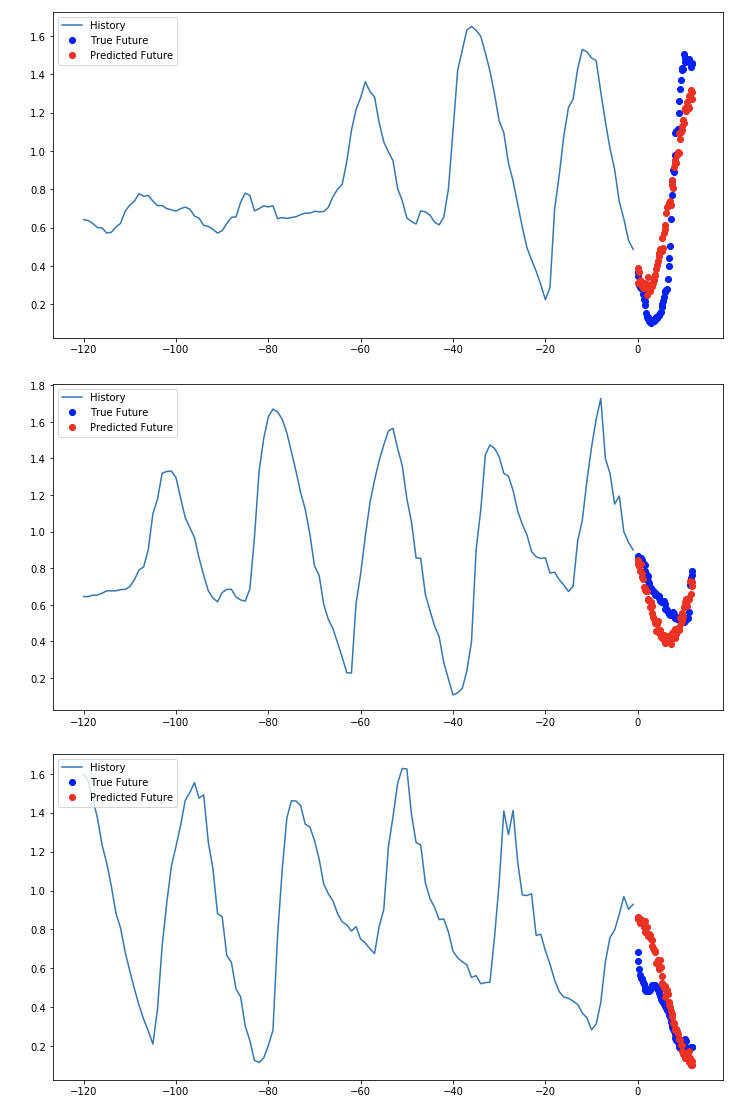
Visualization the Model Prediction
1
2
for x, y in val_data_multi.take(3):
    multi_step_plot(x[0], y[0], multi_step_model.predict(x)[0])
참조: 원본코드
참조: Time series forecasting
코드에 문제가 있거나 궁금한 점이 있으면 wjddyd66@naver.com으로 Mail을 남겨주세요.

Leave a comment