
Multi-User Isolation
계정추가
기본적으로 Multi-User의 구조를 가지는 kfctl_existing_arrikto에서는 User추가가 다르다.
먼저 Single User와의 환경과 다르게 다양한 수의 User를 관리하기 위하여 User Login을 Dex pod을 통하여 자동으로 설정된다.
처음 localhost:31380에 접속하면 다음과 같다.
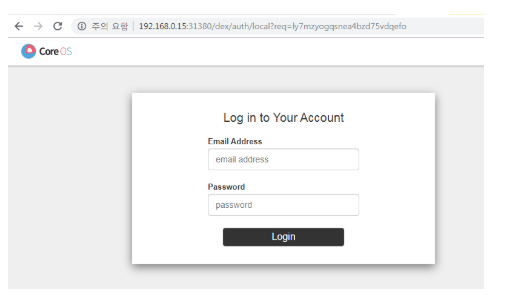
기존에는 Login Page가 필요없이 Profile.yaml을 작성 한 뒤 바로 Namespace가 만들어져서 누구나 접근 가능하였지만 Dex를 통하여 Email Address와 Passward를 통하여 아무나 접근하지 못하게 방지하였다.
이러한 Dex인증을 통과하기 위한 User생성은 다음과 같다.
1. Download the dex config
kubectl get configmap dex -n auth -o jsonpath='{.data.config\.yaml}' > dex-config.yaml
1. Download the dex config
kubectl get configmap dex -n auth -o jsonpath='{.data.config\.yaml}' > dex-config.yaml
2. 다운받은 dex-config.yaml에 User를 추가한다. User를 추가하기 전에 File을 살펴보면 다음과 같다.
# dex-config.yaml
issuer: http://dex.auth.svc.cluster.local:5556/dex
storage:
  type: kubernetes
  config:
    inCluster: true
web:
  http: 0.0.0.0:5556
logger:
  level: "debug"
  format: text
oauth2:
  skipApprovalScreen: true
enablePasswordDB: true
staticPasswords:
- email: admin@kubeflow.org
  hash: $2y$12$ruoM7FqXrpVgaol44eRZW.4HWS8SAvg6KYVVSCIwKQPBmTpCm.EeO
  username: admin
  userID: 08a8684b-db88-4b73-90a9-3cd1661f5466

staticClients:
- id: kubeflow-oidc-authservice
  redirectURIs: ["/login/oidc"]
  name: 'Dex Login Application'
  secret: pUBnBOY80SnXgjibTYM9ZWNzY2xreNGQok
dex-config.yaml File을 Dex인증과 연결하기 위한 설정 내용들이 적혀있고 수정할 부분은 staticPasswords이다.
위의 File에 계정을 추가하기 위하여 File을 다음과 같이 수정하였다.
issuer: http://dex.auth.svc.cluster.local:5556/dex
storage:
  type: kubernetes
  config:
    inCluster: true
web:
  http: 0.0.0.0:5556
logger:
  level: "debug"
  format: text
oauth2:
  skipApprovalScreen: true
enablePasswordDB: true
staticPasswords:
- email: admin@kubeflow.org
  hash: $2y$12$ruoM7FqXrpVgaol44eRZW.4HWS8SAvg6KYVVSCIwKQPBmTpCm.EeO
  username: admin
  userID: 08a8684b-db88-4b73-90a9-3cd1661f5466

- email: wjddyd66@naver.com
  hash: $2b$10$mtB6jtNJxZArnPLNwl3x.ewyU4qkMueH7Q/hbwCAGnHxH97u3uIcG
  username: wjddyd66
  userID: $2b$10$etAeJiVlbVV/rrmc507sDOKbdaIMP7vXefh/OizfKx.OzI4csIKEC

- email: wjddyd1@naver.com
  hash: $2b$10$DI5KFPSOUajZo9c8tti9uu5uKUj/hTuTj4vpB6m1FaGr9I4TVwKLO
  username: wjddyd1
  userID: 5c06aec8-a018-436a-8c7b-339064188219


staticClients:
- id: kubeflow-oidc-authservice
  redirectURIs: ["/login/oidc"]
  name: 'Dex Login Application'
  secret: pUBnBOY80SnXgjibTYM9ZWNzY2xreNGQok
2개의 계정을 추가하였는데 주의해야할 점은 다음과 같다.
- hash 는 비밀번호를 의미하는 주요한 개인정보로서 String형태가 아닌 Hash형태로서 저장한다. Kubeflow에서 설명한 방식으로는 아래 링크와 사진을 참조한다. (참고로 Hash로서 Passward의 값을 주기 때문에 Passward의 값이 같아도 Hash의 값은 다를 수 있다. 같을 확률은 거의 없다.) Online Hash생성: BCrypt
- UserID는 고유해야 하는 값 이다.
3. Update ConfigMap
kubectl create configmap dex --from-file=config.yaml=dex-config.yaml -n auth --dry-run -oyaml | kubectl apply -f -
4. Restart Dex
kubectl rollout restart deployment dex -n auth
Contributor
Contributor 설정
Contributor설정은 간단히 E-mail Address만으로서 추가 가능하다.
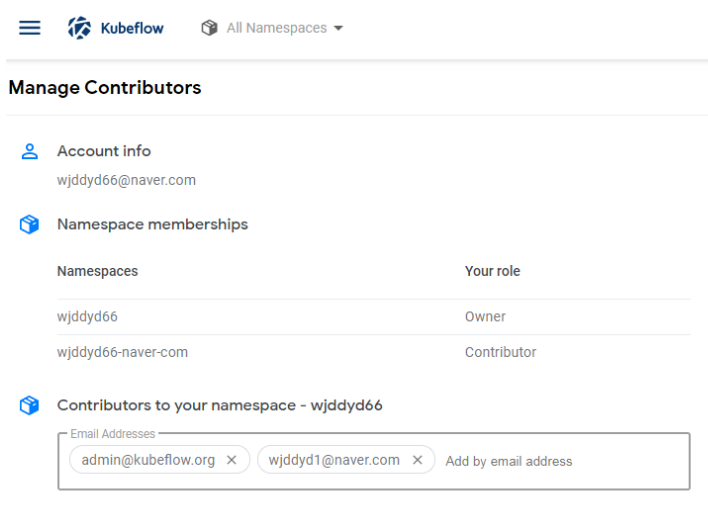
Contributor의 의미
간단한 E-mail로 추가된 Contributor의 의미는 다음과 같다.
현재 구성은 다음과 같다.
Owner: admin, wjddyd1
Contributor: wjddyd66
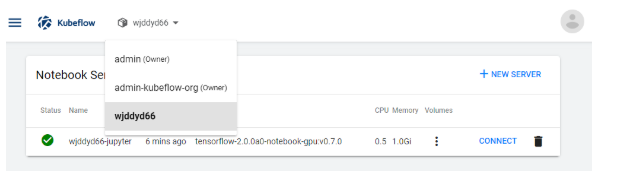
다음과 같은 구성에서 wjddyd66에서 JupyterNotebook생성은 Owner인 admin과 wjddyd1에서는 접속 가능하다.
Admin에서 wjddyd66 JupyterNotebook 접속
단 Contributor인 wjddyd66은 Owner인 admin의 JupyterNotebook에는 접속이 불가능하다.
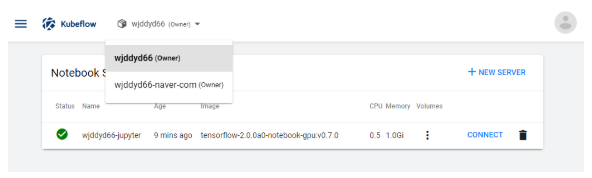
결과적으로 자신의 WorkSpace를 타인에게 Contributor로서 공개하는 것은 가능하나, 타인은 허가없이 자신의 JupyterNotebook의 WorkSpace로 함부로 접근 못한다.
참조:Kubeflow-JupyterNotebooks
코드에 문제가 있거나 궁금한 점이 있으면 wjddyd66@naver.com으로 Mail을 남겨주세요.
Leave a comment