
OpenCV-영상 및 비디오 입출력
사전 사항
참고사항1
현재 cv2를 볼 수 있는 XServer에서 GUI를 땡겨오지 못하는 문제 때문에 결과 확인을 matplotlib 및 ipywidget으로 사용하였습니다.
ipywidgets 정식 사이트
활용 예시
matplotlib Post
참고사항2
현재 Post에서 사용하는 Data를 만드는 법이나 사용한 Image는 github에 올려두었습니다.
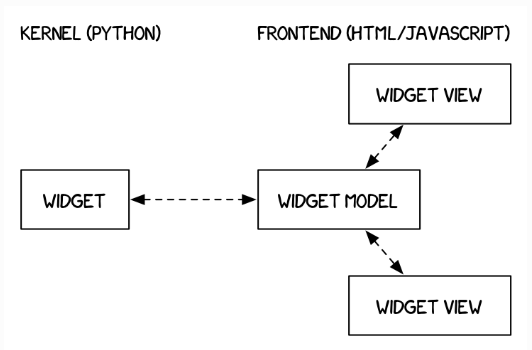
ipywidgets
widgets: 위젯은 종종 슬라이더, 텍스트 상자 등과 같은 컨트롤로 브라우저에 표현되는 이벤트가 많은 파이썬 객체입니다.
- interactive GUIs를 사용할 수 있다.
- Python과 JavaScript간에 안정화된 synchronize가 가능하다.
- widget은 back-end에서 single object로 정의되고 display시 마다 fornt-end에서 보여지게 된다.
필요한 라이브러리 설치
!python -m pip install upgrade pip
!pip install opencv-python
!pip install matplotlib
!pip install pillow
필요한 라이브러리 임포트
1
2
3
4
5
6
import cv2
import matplotlib.pyplot as plt
import time
import ipywidgets as widgets
import IPython.display as display
import copy
영상 입출력과 디스플레이
cv.imread(filename[, flag]): 영상 입력
flag
- cv2.IMREAD_COLOR(1) : 이미지 파일을 Color로 읽음. 투명한 부분은 무시하며 Default 설정
- cv2.IMREAD_GRAYSCALE(0) : 이미지 파일을 Grayscale로 읽음
- cv2.IMREAD_UNCHAGED(-1) : 이미지 파일을 alpha channel 까지 포함해 읽음
cv.imwrite(filename,img[, params]): 영상 파일 출력
params를 통하여 압축 관련 인수로 생략할 수 있다.
영상 파일 정보 읽기
1
2
3
4
5
6
7
8
9
10
11
12
13
14
15
16
17
18
19
20
21
imageFile = './data/lena.jpg'
img = cv2.imread(imageFile) # Read image Color
img2 = cv2.imread(imageFile,cv2.IMREAD_GRAYSCALE) # Read image Gray
img3 = plt.imread(imageFile) # Read image by pyplot
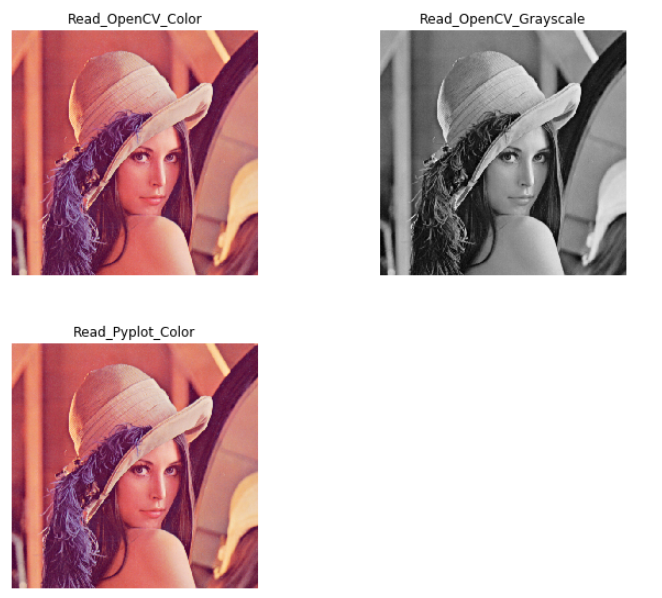
#Color Image
# openCV는 BGR로 사용하지만, Matplotlib는 RGB로 이미지를 보여주기 때문에 같은 Image를 읽어도 결과가 다르다.
#즉 Color Image를 읽는 경우에는 바꾸어서 결과를 출력해줘야 한다.
print('Color OpenCV')
print(img)
print('-'*30)
print('Color Matplotlib')
print(img3)
print('-'*30)
print('GrayScale OpenCV')
print(img2)
Color OpenCV
[[[125 137 226]
  [125 137 226]
  [133 137 223]
  ...
  [122 148 230]
  [110 130 221]
  [ 90  99 200]]

 [[125 137 226]
  [125 137 226]
  [133 137 223]
  ...
  [122 148 230]
  [110 130 221]
  [ 90  99 200]]

 [[125 137 226]
  [125 137 226]
  [133 137 223]
  ...
  [122 148 230]
  [110 130 221]
  [ 90  99 200]]

 ...

 [[ 60  18  84]
  [ 60  18  84]
  [ 58  27  92]
  ...
  [ 84  73 173]
  [ 76  68 172]
  [ 79  62 177]]

 [[ 57  22  82]
  [ 57  22  82]
  [ 62  32  96]
  ...
  [ 79  70 179]
  [ 81  71 181]
  [ 81  74 185]]

 [[ 57  22  82]
  [ 57  22  82]
  [ 62  32  96]
  ...
  [ 79  70 179]
  [ 81  71 181]
  [ 81  74 185]]]
------------------------------
Color Matplotlib
[[[226 137 125]
  [226 137 125]
  [223 137 133]
  ...
  [230 148 122]
  [221 130 110]
  [200  99  90]]

 [[226 137 125]
  [226 137 125]
  [223 137 133]
  ...
  [230 148 122]
  [221 130 110]
  [200  99  90]]

 [[226 137 125]
  [226 137 125]
  [223 137 133]
  ...
  [230 148 122]
  [221 130 110]
  [200  99  90]]

 ...

 [[ 84  18  60]
  [ 84  18  60]
  [ 92  27  58]
  ...
  [173  73  84]
  [172  68  76]
  [177  62  79]]

 [[ 82  22  57]
  [ 82  22  57]
  [ 96  32  62]
  ...
  [179  70  79]
  [181  71  81]
  [185  74  81]]

 [[ 82  22  57]
  [ 82  22  57]
  [ 96  32  62]
  ...
  [179  70  79]
  [181  71  81]
  [185  74  81]]]
------------------------------
GrayScale OpenCV
[[169 169 168 ... 175 162 138]
 [169 169 168 ... 175 162 138]
 [169 169 168 ... 175 162 138]
 ...
 [ 53  53  59 ... 115 112 114]
 [ 53  53  64 ... 117 118 122]
 [ 53  53  64 ... 117 118 122]]
영상 파일 출력
1
2
3
4
5
6
7
8
9
10
11
12
13
14
15
16
17
18
19
20
21
22
#출력 크기 조정
plt.figure(figsize=(10,10))

OpenCV_Color = plt.subplot(2,2,1)
OpenCV_Color.set_title('Read_OpenCV_Color')
img = cv2.cvtColor(img,cv2.COLOR_BGR2RGB)
plt.axis('off')
plt.imshow(img)

OpenCV_Grayscale = plt.subplot(2,2,2)
OpenCV_Grayscale.set_title('Read_OpenCV_Grayscale')
plt.axis('off')
plt.imshow(img2, cmap="gray")

Read_Pyplot_Color = plt.subplot(2,2,3)
Read_Pyplot_Color.set_title('Read_Pyplot_Color')
plt.axis('off')
plt.imshow(img3)

#각각의 subplot 간격 조정
plt.subplots_adjust(wspace=0.5,hspace=0.1)
plt.show()
영상 파일 출력 결과
영상 파일 저장
1
2
3
4
5
6
7
8
9
10
11
12
13
14
15
16
17
18
19
20
21
22
23
24
#사진저장
cv2.imwrite('./data/lena_grayscale.png',img2)
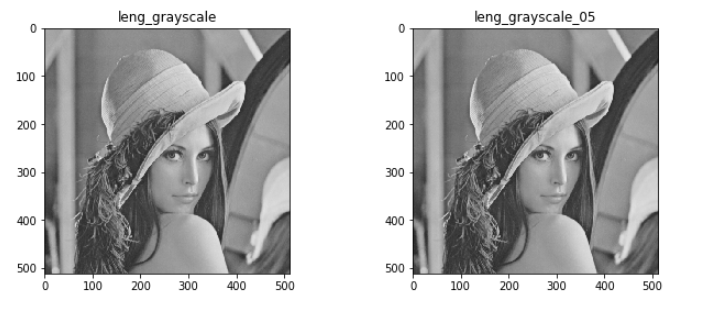
#사진 저장시 읽어온 사진과 다른 Format이여도 가능하고 영상의 품질 또한 0 ~ 100사이로 지정할 수 있다.
#Default는 95이다.
cv2.imwrite('./data/lena_grayscale_05.png',img2,[cv2.IMWRITE_PNG_COMPRESSION,5])
#저장 사진 확인
img4 = cv2.imread('./data/lena_grayscale.png')
img5 = cv2.imread('./data/lena_grayscale_05.png')
plt.figure(figsize=(10,10))
leng_grayscale = plt.subplot(1,2,1)
leng_grayscale.set_title('leng_grayscale')
plt.imshow(img4)
leng_grayscale_05 = plt.subplot(1,2,2)
leng_grayscale_05.set_title('leng_grayscale_05')
plt.imshow(img5)
plt.subplots_adjust(wspace=0.5)
plt.show()
영상 파일 저장 결과
비디오 프레임 캡쳐와 화면 표시
cv2.VideoCapture() or cv2.VideoCapture(filename or device): 비디오 획득 객체 생성
cv2.VideoCapture.read([image]): 프레임 획득
cv2.VideoCapture.grab(): 프레임 잡기
cv2.VideoCapture.release: 비디오 객체 해제
cv2.VideoCapture.get(propld): 비디오 특성 얻기
cv2.VideoCapture.set(propld,value): 비디오 특성 설정
propld
- cv2.CAP_PROP_POS_MSEC: 밀리초로 현재 위치
- cv2.CAP_PROP_POS_FRAMES: 캡쳐될 프레임 번포
- cv2.CAP_PROP_FRAME_WIDTH: 비디오 프레임의 가로 크기
- cv2.CAP_PROP_FRAME_HEIGHT: 비디오 프레임의 세로 크기
- cv2.CAP_PROP_FPS: 프레임 속도
출처:karl27 블로그
출처: ipywidget 정식 홈페이지
참고사항
JupyterNotebook에서는 ii를 누르게 되면 Keyboard Interrupt가 걸리게 된다.
비디오 화면 표시
1
2
3
4
5
6
7
8
9
10
11
12
13
14
15
16
17
18
19
20
21
22
23
24
25
26
27
#비디오 객체 생성
cap = cv2.VideoCapture('./data/test.mp4')
#비디오 객체 정보 획득
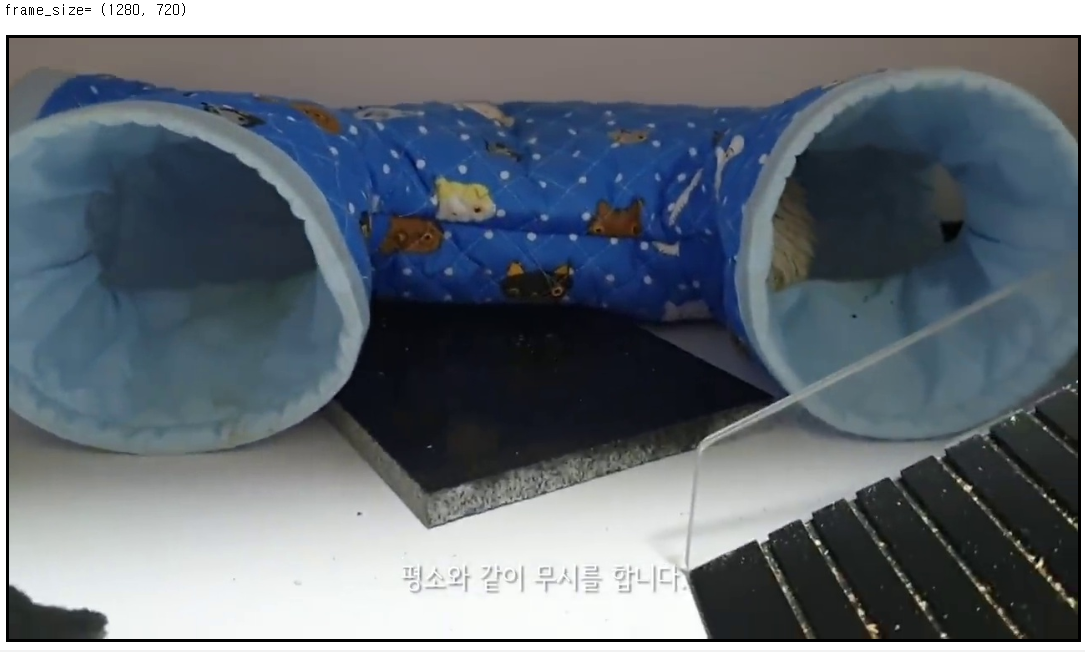
frame_size = (int(cap.get(cv2.CAP_PROP_FRAME_WIDTH)),int(cap.get(cv2.CAP_PROP_FRAME_HEIGHT)))
print('frame_size=',frame_size)
#Jupyter notebook에서 Widget 생성
wImg = widgets.Image(layout = widgets.Layout(border="solid") )
display.display(wImg)
#비디오 객체 있을시
if cap.isOpened():
#비디오 객체의 정보를 얻어옴
ret, img = cap.read()
while ret:
try:
# 동영상 파일에서 캡쳐된 이미지를 이미지 파일 스트림으로 다시 인코딩을 한다.
tmpStream = cv2.imencode(".jpeg", img)[1].tostring()
wImg.value = tmpStream
# 20 프레임이 되기 위한 딜레이 다만, 실제로 입력한 것보다 조금 더 딜레이가 있다
time.sleep(0.05)
ret, img = cap.read()
except KeyboardInterrupt:
break
#비디오 객체 해제
cap.release()
비디오 화면 표시 결과
비디오 화면 저장
- out1: 원본과 동일한 크기의 영상을 20fps로 저장
- out2: 원본과 동일한 크기의 영상을 20fps + grayscale로 저장
1
2
3
4
5
6
7
8
9
10
11
12
13
14
15
16
17
18
19
20
21
22
23
24
25
26
27
28
29
30
31
32
33
34
35
36
37
38
39
40
41
42
43
44
45
46
47
48
49
50
51
52
53
from ipywidgets import Layout, Button, Box, VBox, Label

#비디오 객체 생성
cap = cv2.VideoCapture('./data/test.mp4')
#비디오 객체의 특성 출력
frame_size = (int(cap.get(cv2.CAP_PROP_FRAME_WIDTH)),int(cap.get(cv2.CAP_PROP_FRAME_HEIGHT)))
print('frame_size=',frame_size)

#저장할 비디오 출력을 위한 코덱
fourcc = cv2.VideoWriter_fourcc(*'DVIX')

#fps를 20.0 frame크기를 원본 동영상과 같이 설정
out1 = cv2.VideoWriter('./data/record0.mp4',fourcc,20.0,frame_size)
#하나의 비디오는 Color가아닌 Grayscale로서 저장
out2 = cv2.VideoWriter('./data/record1.mp4',fourcc,20.0,frame_size,isColor = False)

#Jupyter Notebook에서 확인할 Widget 설정
items_layout = Layout( width='auto')

box_layout = Layout(display='flex',
                    flex_flow='row',
                    border='solid',
                   width='100%',)

wImg1 = widgets.Image(layout = widgets.Layout(border="solid"), width="50%")
wImg2 = widgets.Image(layout = widgets.Layout(border="solid"), width="50%")

items = [wImg1, wImg2]
box = Box(children=items)

display.display(box)

#저장하면서 동영상의 출력
while True:
    try:
        retval, frame = cap.read()
        if not retval:
            break

        out1.write(frame)
        tmpStream = cv2.imencode(".jpeg", frame)[1].tostring()
        wImg1.value = tmpStream

        gray = cv2.cvtColor(frame,cv2.COLOR_BGR2GRAY)
        out2.write(gray)

        tmpStream = cv2.imencode(".jpeg", gray)[1].tostring()
        wImg2.value = tmpStream

    except KeyboardInterrupt:
        break

cap.release()
비디오 화면 저장 결과

참조:원본코드
참조:Python으로 배우는 OpenCV 프로그래밍
문제가 있거나 궁금한 점이 있으면 wjddyd66@naver.com으로 Mail을 남겨주세요.
Leave a comment